Friday, August 31, 2012

Playing with Love and Simple Stories

Happy Friday everyone (just barely, but still Friday nonetheless)!!!! This "back to school" time is really "kicking my butt"!!!! I have been sooo very tired lately but am still managing to get in some (well needed) scrap time :-)
Last month, I was lucky enough to win a few challenges through various scrapbooking sites and received some pretty GREAT scrapbooking items!! One of them was a kit by "Simple Stories" called Summer Fresh.  LOVE IT!!!! I was able to create some beautiful layouts for my September challenges over at Colorful Creations and Sketchers
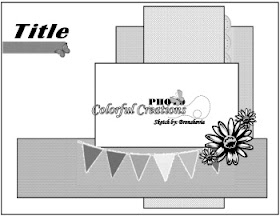
The first page is for the Design Team Reveal over at Sketchers on Saturday.  Sheshe created this beautiful sketch for us to work with...

And here is my creation...


What did I tell you?!?!  Isn't this line just wonderful?!?! Everything on this page was included with the kit... Papers, die-cut stickers, "denim" numbers, quote stockers, EVERYTHING!!!!! I had sooo much fun working with both this kit AND this sketch!!! And I have to say that I am very pleased with the end result :-)

My next layout was created for both my September Project Challenge at Colorful Creations, but following a sketch from Sketch Inspiration.  I think I became addicted to working with sketches from the first time I finished one!!!! Any who, here is the sketch...


And another bright and "summery" page from the Summer Fresh line!


Again, everything you see here is from the same kit.  
For the month of September, I decided to work on pinwheels for my challenge.  I've been seeing them more and more on pages, cards, weddings, etc.  They have a very appealing look and are very versatile since YOU are choosing the paper that makes them!!!! I wanted to "go big" on this one to fit with the theme of the page, however most pages tend to have them much smaller.  This is a picture of my oldest daughter at a friend's birthday party earlier this year.  She swears she "loves" cupcakes, but really she just loves to lick all the frosting off of them and throw the cake away! 

And last, but certainly not least, I bring you card I made with love.  No, really.  I used a stamp from Tim Holtz that says "LOVE"!!!!! And it's AMAZING!!!! My husband was in desperate need of a "pick me up" so I decided to make him an inspirational card.  He truly is a wonderful man, and I wanted to remind him of just how important he is to me! (I know... blah, blah, blah...) This card is for my September Card Challenge, also held at Colorful Creations.  Stop in and check it out!!!
I started with a standard 5x7 card base with tan cardstock, then dressed it up a bit.   I had some tan vintage paper in my scrap pile that I used as the background here.  I also found some red Co'ordinations distress paper by Tim Holtz in my pile that I embossed and sanded, to give the card some texture.  When that was finished, I used my brayer to add a thin coat of medium over the raised areas, then added some Perfect Pearls to give the card an "ever so light" shimmer.
The "vintage white" paper is also from Co'ordinations, and is from their "Whitewash" line of core papers. I added some atop of the red paper, inking the edges with Tim Holtz Distress Ink in Tea Dye.  Then I embossed another piece with a Tim Holtz Sizzix "Frame" embossing folder, and used my hobby knife to cut around it.  The stamp is also from Tim Holtz (I swear I did not do this on purpose but Tim Holtz pretty much owns this card!!!) and comes inside the same frame you see embossed here.  I topped it off with some swirls and pearls and a few inspirational words on the inside!!!! What do you think?!?

And here is a side view so you can see the dimensions!!!


Well, as usual gang... Thanks for stopping in and have a LUCKY day :-)


Sunday, August 26, 2012

You and Me

Hello again!!! Thought I'd share with you a layout I finished for a site I only recently came by called C'est Magnifique!  They are "kit club", where you can purchase kits of scrapbooking supplies that all go together, to form beautiful projects.  Although I do not participate in the purchasing of kits (yet!), I decided to go ahead and enter their monthly sketch challenge.  
Here is the sketch...

And here is my creations!!!


I LOVE it!!!!!!!!!!!!!!!! This is a picture of me and my husband on our Honeymoon.  We were all dressed up for the "Captain's Dinner" aboard the Carnival Legend.  
I used various Recollections and DCWV papers for the page and rosettes.  I did not want to add another photo so I decided to make a "Title Box".  The paper in the box already had this beautiful butterfly on it so I just trimmed it down and framed the butterfly with rhinestones.  The title itself is from K&Company.  The glittered butterfly border down the middle is actually just cut from a piece of paper I had lying around.  I also traced some of the leafs at the top with one of my Glaze pens to give them some depth.  I am obsessed with making rosettes, and I thought this sketch called for them!!!! I think they just look soooo nice on this page!!! 

Thanks sooo much for stopping by and have a LUCKY day :-)


Word of the day... Busy!!!!!!!

Hey there my fellow followers!!! I am elated to bring you some WONDERFUL news!!!!!! I will now be a Design Team member for a wonderful new site called Sketchers!!!!  It's an awesome site that you can use to get your groove back... or even just to grab a little inspiration!  Each week, a new sketch will be posted and there will be challenge on the 1st and 15th of each month.  Please be sure to stop by and check it out!! And don't forget to tell a friend :-)

As for my creativity, I have been quite a busy bee this week.  my oldest daughter started Kindergarten and HOLY MOLY was it hectic!!! I also had my youngest daughter's second birthday yesterday (which was completely draining!) at a park with our families.  I spent the majority of the week getting everything together and making all the decor (pics to come), including Princess hats, tiara's, Prince's crowns, pinwheels, "glass" slippers, and much more!!! Yes, I was one very busy mommy this week.  But I still managed to squeeze in a few cards and layouts that I'd love to share with you.  

The first is the weekly Guest Designer Sketch challenge at Colorful Creations.  We were lucky to have Mette as our Guest and she has some beautiful work.  Please be sure to stop by her blog and show her some love!!!!
This is the sketch we had to work with....

And this is the layout I created.  


This is my younger sister in her Senior Pictures earlier this year.  I know, I know... She's BEAUTIFUL!!!!!
For the challenge, I started with paper from DCWV and Recollections, cutting them down to meet the sketch criteria.  I also sanded some Black Magic Coordinations cardstock to give the page some texture.    The beautiful heart die-cut is from a care package I received from Rachael, another wonderful Design Team member over at Colorful Creations.  I used transparency for the title, then added some bling, some lace, and epoxy words to finish it off.  I just love it!!!

I also made some cards this week for some very special people.  
The first card I made was for Alyssa's new teacher.  Just an inspirational "Back to School" card to get her mojo back!!! It was very simple... Just pieced together some scraps, added twine and an apple die-cut, then stamped various inspirational words along with a flower and butterfly.  I hope it brought a smile to her face :-)

Another card I made was for a very special woman in my life.  My daughter's grandmother on her father's side (whom she calls "Nanny") has been a huge part of my life.  She helped me through some very trying times and I just wanted to show my appreciation.  We are still VERY close and I could never repay her for all she has done for me.  
I used some new cardstock papers from a Recollections pack at Michaels that are very bright and cheery!!! I embossed one of them with my new Swiss Dots Cuttlebug folder (that I am completely in love with!) and added them to the front piece to act as a "frame".  I stamped the sentiment atop of some very beautiful flowers.  I learned this technique on youtube and I think it's just so pretty.  I merely stamped the same image on various sheets of paper, then punched out the top of the flower with my 1' circle punch.  Using metallic brads, I added the pieces to the page and voila!!! Aren't these flowers so neat?!?!?

Well, as usual gang... Thanks for stopping in and have a LUCKY day :-)


Sunday, August 19, 2012

Cards and Such

Okay everyone... I have now ventured into the world of card-makers!!!! isn't that exciting?!?!? Every month, I will be hosting a mid-month card challenge over at Colorful Creations.  Please stop in and check it out :-)

For my first challenge, I decided to do something a little different. After watching several videos on how-to's and reading over various tutorials, I ended at using household cleaners to stamp with.  What was that??? Bleach? Dish Detergent? Are you serious? Well, I gave it a "test drive" and was amazed by the results!!!!
I started by inking plain white cardstock with Tim Holtz Distress inks in Wild Honey, Worn Lipstick, Fired brick, and Spiced Marmalade.  Then I set my stamp atop of a plate lined with Cascade (dish detergent) that acted as my actual stamp pad.  Then I laid the stamp on the inked cardstock and waited!!!!  I happen to be a very anxious person so I wanted to speed up the process a bit by taking my heat gun to the paper.  The heat actually makes these tiny bubbles come up from the detergent to give you one unique look!!!

Another technique I came across while browsing is called the reflection technique.  I wanted to give this a try for the "Say it with words" challenge hosted by Anne at Colorful Creations and combine it with the Holiday Challenge over at Sketches4All.  The "word" to use this month on the challenge was "Happiness".  The holiday challenge is called "The end of summer" challenge.  For the challenge, you are to create a project that means the end of summer to you.  Whether it's back to school, no more beaches, etc.  I think of fall when I think of summer ending and wanted to incorporate that with my card.
I started by stamping a tree stamp (any "nature" type stamp should work fine) on plain white cardstock.  Then, with the same stamp, I stamped a piece of transparency.  I took the transparency and laid it upside down (ink side down) on the cardstock and pressed firmly.  You are merely transferring the image from the transparency to the cardstock, but backwards.  I used Tim Holtz inks in Shabby Shutters and Tumbled glass to create a "land and water" type of effect.  This gives you the impression that there is a reflection of the tree in water.  Very neat!!!! I used my pop-dots to place atop of tan cardstock with a sentiment that says "Happiness comes through doors you didn't even know you left open".  I also ran some yellowish-gold colored cardstock through the Sizzix with the Swiss Dots embossing folder from Cuttlebug and laid it behind the image.  I am IN LOVE with this card!!! It just looks so beautiful :-)


Thanks again for stopping in!!! Have a LUCKY day :-)


A little bit of this... A little bit of that...

Well hello  you guys!!!! It's been a while so i have many things to "show off" today!!!! Please take your time to see my wonderful creations and thanks for stopping in :-)
The first thing I'd like to show you is a layout I made for a Guest Designer sketch at Colorful Creations.  We were lucky enough to have Christa Paustanbaugh as our designer and this is the sketch we were to work with....

For my page, I decided on scrapping a picture of my youngest daughter when she was just a baby!!!1 She's about 3-4 months here and comfortably laying in the "boppy chair"!! 
I used papers from Cloud9 Design and embellishments from K&Company (the bird and title) and Recollections (the butterfly). I wanted to keep this very simple to keep with the sketch.  I used my Martha Stewart large "Daisy" punch for the middle border and a K&Company rub on for the flourish around the photo.  It's funny to look at this photo... my daughter will be turning two this Friday and this seems like only yesterday!!! Isn't she amazing?!?


The next item on the list is a page I made for "My Challenge" over at Colorful Creations.  I have started a monthly scraplift challenge to begin on the fifteenth of every month.  I decided to scraplift a page from our very own Caroline J.  Here is her BEAUTIFUL page....


And here is my take on her layout... I decided on papers from Colorbok and Recollections.  The flowers and journaling tag are from K&Company as is the decorative brad by the photo and other various embellishments.  I also decided on using my Martha Stewart large AND small Daisy punch for this page as well :-)


I was also able to complete the weekly sketch over at Sketch Inspiration which is pictured below...


For this sketch, I decided on a layout with photos from my honeymoon.  My husband and I went on a seven day cruise to the western Caribbean where we stopped at Isla Roatan, Honduras.  This island is BEAUTIFUL!!!!!!  We took a scenic tour to capture the beauty of the island and I was able to grab some neat photos along the way.  These are just a few.  
The papers are all K&Company as is the title.  The flowers are from Prima and Recollections.  I did try something new on this page and made a "lace flower" (pictured in the bottom left).  I sent my husband to the store for box pleated ribbon and he came back with pleated lace fringe instead.  Well, when life gives me lemons,  I take the tequila!!!! So I decided to cut a piece up and roll it.. that's it!!!! After hot-glueing to some cardstock, I played with the ruffles, added two pins, and Voila!!!! A lace flower at its best!!!


Okay, so those of you who are still with me, I have just a couple more items to show you!!! 
The next page is for the Inspiration challenge hosted by Tabitha over at Colorful Creations.  She provided us with this picture...
And told us to create something wonderful from it!!! Literally, you can draw your inspiration from anything on the photo that moves you... So I decided to take the colors from the letters on the chalkboard and have at it!!!
I started by using a sketch by Rebecca Ludens. 
  Then I just pieced everything together to create this beautiful layout of my oldest daughter on Easter of this year.  The papers are from Stampin Up, title and flowers are from Recollections, and the brads are from Studio G.  I found this AWESOME chipboard pack from Ditto called "resist board".  It is exactly what it sounds like.  You can ink it, color it, or whatever you like to it and the white lines will "resist" the color.  Therefor, you end up with this BEAUTIFUL piece that is extremely easy to make!!!! I used Tim Holtz Distress inks in Wild Honey and Shabby Shutters to color it in.  She is amazing isn't she?!?!?


 Thanks sooo much for stopping in gang!! Have a LUCKY day :-)


Saturday, August 11, 2012

Back To School Time

Today I bring you a page that is perfect for this time of the year.  Back to school time, that is!!!!  I completed a sketch challenge for Sketch Inspiration and combined it with the blog challenge for the Colorful Creations Blog where I needed to make a "school" themed page with some journaling on it.  
Here is the wonderful sketch...


For the challenge, I decided on adding several layers of school type papers (apples, buses, starts, etc...). Then, I used blue and red permanent markers to "ink" the edges so that I could get a clean line on the pages.  The picture was sent home from her school and is laminated, so the quality is not fantastic but it works all the same!  The challenge required some journaling so I made a "coloring book" to hide my journaling with a twine bow to keep it down.  I added various Jolee's embellishments to finish it and voila!!!! Back to school it is!!!! 


Thanks for stopping in guys and have a LUCKY day :-)

Walking on Sunshine

Well hello everyone!!!!!! It's been sometime so I have LOTS of new things to show you!!!! And I am VERY excited to do so!!!! I'll start with another card I made for Paula's dry embossing challenge at Colorful Creations.  The last two I made did not have enough embossing for me so I really got creative with this one. 

I started by embossing white cardstock with a Tim Holtz Sizzix folder called "Rays".  Then I colored it all in with various watercolor pencils and went to work with my handy paint brush and a cup of water.    I let it dry for a bit then coated the top with Ranger's Perfect Pearls to give it some "glimmer".  To finish it, I tied some twine around the bottom and added a button... Voila!!!!! Sunshine on a card!!!! I think it's beautiful :-)


Here is a close-up of the "glimmer"... hope you can see it!

Another challenge I worked on was the August Sketch challenge over at Sketches4All.  Here is the sketch I had to work with....


And here is my layout!!! I love it!!!
This is my oldest daughter on Father's day of this year.  We went to Picnic Island on the Bay here in Tampa.  Isn't she sweet??? (Don;' let the eyes fool ya... she's a handful!!!)
For this page I started with the pink swirly paper in the background by Cloud9 design.  The others are mixtures of DCWV, K&Company, and Recollections.  I cut the banner with an olive green colored cardstock with a brown shadow and white chipboard letters.  I hid a tag behind the photo to combine this challenge with Anne's "For Girls Only" challenge at Colorful Creations.  I really like the colors on this one :-)


I also completed another sketch challenge at Sketches4All for Kath's Monthly Challenge and combined it with Brenshevia's White Plus One challenge at Colorful Creations.  
Here is the sketch....


I decided on using orange as my bright color to use with white, although I'm not a big fan of it!  I had some photos from July 4th of this year that turned out pretty well.  I usually have a VERY hard time with taking pics of fireworks because I never get the right shutter speed.  It took me nearly the whole time to get these good ones but I'm glad I did!!!
This is my husband with my youngest daughter as she gazes at the lights in the sky :-) She LOVED watching them!!!!


The next project was for Fi's Colour Palette at Colorful Creations.  I really wanted to make a "congrats" card for someone and thought these colors were perfect to do it!  I also combined this challenge with Cheryl's "Get your vintage on" challenge at S4A.  
This is the color pallete Fi chose this month...

I started with a 5x7 card in  navy blue.  I added several layers of colored cardstock to match the pallete. All the edges have been distressed and inked with various Tim Holtz distress inks (Broken China, Peeled Paint, Forest Moss, and Faded Jeans).  The top paper is from a K&Company matstack.  I stamped the image on  the top layer then embossed it with dark green embossing powder.  I added brads to the four corners and hand stitched it to meet the challenge criteria.  I also added some twine to this one as well (really like the look!) and added my sentiment.  The end result turned out much better than I originally thought!!! I LOVE it!!!


Thanks for stopping in gang!!! Have a wonderful day :-)


Tuesday, August 7, 2012

Tribute to my sister

The next thing I'd like to show you is a tribute page I made for my sister's graduation earlier this year.  The sketch I followed is from Simple Scrapper and looks like this...


I decided to combine this sketch with a challenge from Rachael over at Colorful Creations.  The challenge is a recipe challenge for which you are to include the following items to "create" your page:
  • Texture and/or embossing
  • Stitching
  • Minimum of five circles
  • Journaling
  • Gems
  • One fussy cut item


I started with a grey co'ordinations embossed paper and sanded the raised areas to expose the lovely words beneath.  Then I cut out nine 3x3 squares in various papers, then matted them.  To follow the sketch, I placed my sister's picture in the top right corner.  Then I added numerous "graduation" themed embellishments and placed my title in a large red banner.  The paper in the middle on the top row had faux stitching on it, so I merely followed the pattern and hand stitched it with black embroidery thread.  I fussy cut the flag from pattern paper and attached a toothpick colored with a silver sharpie marker.  I wrote my journaling inside the flag to hide it.  I absolutely LOVE LOVE LOVE the way this page came out!!!!!!!  Thanks for stopping in and have a LUCKY day :-)


Saturday, August 4, 2012

Colorful Creations Challenge #2


Hey there fellow scrapbookers!!!! I've been super busy trying to finish these wedding invitations (will share once completed) and trying to finish some challenges over at Colorful Creations.  Of course, it's a new month so there are NUMEROUS challenges to complete... Stop on by and check them out!!!!! Remember, you can win FREE stuff!!! Yep.. free supplies just for doing something you love in the first place!! Isn't that amazing?!?!?  
Okay, that's enough.  I'd like to share with you a few things I've been working on this week.  The first is a page I completed for MY Monthly Challenge (you can enter for a chance to win free stuff!!!!!).  I decided to take it back and add pockets on my page as my challenge.  You can submit a card or layout as long as you've added pockets to them.  I'll include the links in case you're interested in learning!  The pockets can be made with just about anything!!!! I decided on plain old pattern paper.  

Here is a pic of the pocket....


All I needed to do was cut and score a piece of pattern paper then adhere it to the page.  Since we are the month of August, I decided on a "school themed" layout.  I added a tag that I embossed with a Cuttlebug "Stars" embossing folder and inked with various Tim Holtz Distress Inks.  LOVE the look!!!! Then I did my journaling on a separate piece of paper and put it on top!!!
Instead of ribbon on the tag, I went with a tassel I made from embroidery thread to fit the theme of the page.  Isn't it darling??? Here is the final layout...  


This is my oldest daughter at her preschool graduation back in June.  I love to brag about my babies :-)

I was also able to complete another page for my sister's album (Yes, I know.  The ongoing saga of my sister's album... but I will continue to share until it's done!!!!).  This was for the Guest Designer Sketch by Lynn Skokoples at Colorful Creations.  
This is the sketch I had to work with...


And here is my finished product!!! Yes, I KNOW this looks crazy!!! My sister is a Converse fanatic and I thought this would be a great way to reflect her "style" during her Senior year!!!! The papers are a mixture of Recollections and DCWV.  I am in love with the upside down bottle caps!!!! They really look wonderful on this page!  


Here is a card I completed for Paula's Challenge which was to add dry embossing to your project.  I found a card like this through Google images and thought it looked so pretty!!!!! 
I started by cutting and scoring a 5.5x5.5 card.  The circles are cut out at 2.5, 3.75 and 4.  The scallop circle was cut at 3 and the die-cut at 2.25.  The die-cut is from the Cricut Mother's Day cartridge and the circles I cut using Cricut Font and Basic Shapes.  I inked all the edges with Tim Holtz Distress ink in Walnut Stain and put it all together to create this wonderful "Baby Girl" card.  I am attending a craft show in November and am making various things to "show off"!!!!!! 

Lastly, for Andrew's challenge, w were required to create a  "fantasy" tag.  I really know nothing about fantasy and had to research it a little before hand.  I came across some unicorns and decided to run with that since my mom LOVES them!!!!! She has a new unicorn tag now!!!!! 
I started by embossing the tag with two different folders.  Then I used Tim Holtz Distress Inks in Spun Sugar, Tumbled Glass, and Dusty Concord to ink the entire area.  I went over the raies areas with a paint brush and clear glitter glue. I added various stamps and cut the unicorn from the Best Images of 2010 Cricut cartridge. The lace at the bottom is called "mother of the Bride".  
Here is the end result...


I have much more coming (including the wedding invites) so be sure to stay tuned!!!!!
Thanks for stopping in and have a LUCKY day!!!