June 2014

June 2014

Monday, November 4, 2013

Hop Into The New Year With Sketch N Scrap!!!

Happy Monday everyone!!! I really hope you have been enjoying the Sketch N Scrap Holiday Hop so far!!!  


Today, I bring you a wonderfully inspiring card for the New Year!  Not just any card... But a card that was PUBLISHED in the first issue of Let's Get Sketchy's Sketch Inspired Magazine!!!!  Here's a look at the magazine page:


And here is my actual card:


I decided to go with "non-traditional" New Year colors (Black, Gold, Silver, etc) and create something fabulous!!!!  This is what I came up with :-)
I used papers by Coordinations and K&Company.  The die-cut was cut using the Spellbinders "Scalloped Circles" die and my Grand Calibur, and the digi stamp is by "Cuttlebug Cuties".  I used my Spectrum Noir markers to color her in, then topped off the card with clear glitter glue, a ribbon bow and trim, sparkly flowers, and a die-cut clock that was inked and topped with a thin coat of clear glitter glue as well :-)


Now... For the "Good Stuff"!!!!!  
To be entered into a drawing for a FAB-U-LOUS prize pack, make sure you are a follower of the Sketch N Scrap Blog and MY Blog as well.... Then leave me a comment letting me know a New Year's Resolution you actually "stuck" with!!! 
(If you're anything like me, this may be a bit difficult!!! Hahahaha!!!!)  
That's it!!!! Easy peasy, right?!?  One winner will be randomly selected and announced on November 12th!!!! Here's a "peek" at what's up for grabs:

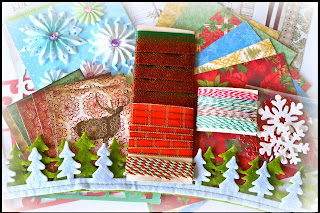
~ MME "Merry and Bright" Double Sided 6x6 Papers
~ K&Company Double Sided "Visions of Christmas" Mat Stacks
~ SEVERAL Holiday Trims
~ Various "Christmas Style" Twine
~ K&Company Glitter and Bling Rosettes
~ Christmas Die-cuts
~ Glitter Snowflakes
~ And MORE!!!!


If you haven't had a chance to check out the AMAZING Halloween ATC Frame that Jennifer made, you can still see it here!!!


If you have missed any of the wonderful inspiration from the previous designers you can just pop on over to the SNS blog to find all the links.


The Hop is scheduled to take a small break after today for our regular blog schedules, but Stephanie will be bringing you some wonderful inspiration for Remembrance Day on November 7th!!!

The hop runs until the 8th November so make sure you check out the SNS blog each day.


On another note, I also wanted to share with you another of my creations that was featured in the magazine!!!!  Here is the magazine page:


And here is the actual page:


You can read more about this page from a previous post here!!!!


Well gang... Wishing you Happy Holidays and as usual.... Thanks for stopping in and have a LUCKY day :-)


Sunday, November 3, 2013

Let's Get Sketchy with Simple Stories 24/Seven!!!!

Happy Sunday everyone!!!!  Hope you have all had a fabulous weekend thus far!!!!

"Fun Memories" with Simple Stories "24/Seven" Paper Collection and Embellies
I'm here today to share with you a layout I created for the week 4 sketch over at Let's Get Sketchy!!!!  Here is the sketch:

And here is my layout:


I had some scraps and embellies lying around from the Simple Stories 24/Seven paper collection and decided to put them to use!!!  These pictures were taken at my oldest daughter's sixth birthday last year :-)
I followed the sketch quite literally, even adding some pearl mist in copper on the yellow chevron paper to mimic the "shadow" appearance on the top of the sketch.  The black chevron "arrows" were cut from washi tape!!!! I distressed the edges of the paper then went around them with a mixture of distress inks and glimmer mist with a make-up sponge (really cool technique!!!!).  I finished the page with various rub-ons by K&Company and voila!!!! A simple, but cute page to remember such a wonderful day :-)

P.S.  Stay tuned tomorrow for another fabulous challenge and another chance to win some wonderful prizes!!!!  I will also be revealing a secret.... You'll have to stop in tomorrow to see what it is!!!!!

Well my friends... Thanks soooo much for stopping in and have a LUCKY day :-)


Saturday, November 2, 2013

Enabler Giveaway WINNERS ANNOUNCED!!!!!!

Happy Saturday everyone!!!  Hope you're all set to have a fabulous weekend!!!  

Well, the winners are in for the giveaway!!!! I'm sure all of you are soooo excited to see who won?!?  
Well, I have a surprise too.... Since I had over 90 entries, I decided to send out 3 prizes!!!  That's right!!!!  3 wonderful packs of goodies to 3 LUCKY winners!!!!!

Here's how I choose the winners:
First, I wrote down all the entires on paper; if you had two or three entries, I wrote your name two or three times!!!  
Here's a look:

The rest was left up to Random.Org.  The first winner for the Grand Prize shown here is:


PAULA!!!!!!!!
Paula said" Probably my favorite thing to create is layouts although this year I probably have been doing more cards. I love mixed media and art journaling too! Guess I am just a paper crafting addict..."


Next up?!?  

The Graphic 45 "Steampunk Spells" paper collection goes to:


LAINIE!!!!!!!!! 
Lainie said "Anyway, I love your site and I think I like doing all of the paper crafting things equally - I just have to mix them up so I don't get bored doing one specific thing over and over. But maybe I love layouts just a smidge more. However, I made my first card for one of your challenges and fell in love with that, too."

And last, but certainly not least....  I have put together one more prize package for another LUCKY winner!!!!  And the winner is:


KAREN RUIZ!!!!!!!
Karen said "My favorite is minis...... Lil fat minis!"

CONGRATS to all of you!!!!!!

WINNERS: Please email me at Brandimatos@gmail.com with your mailing address to claim your prize within 10 days!!!!

I want to give a BIG THANKS to all of you who entered!!!! Stay tuned for more exciting news on the 4th!!!!   

As usual.... Thanks soooo much for stopping in and have a LUCKY day :-)


Thursday, October 31, 2013

Forver Love with Pink Paislee and Vintage Voyages with Graphic 45 "Steampunk Spells" Paper Collections!!!

I am posting this a little early since tonight is Halloween and I will be busy Trick or Treating with my two beautiful "fairies"!!!! 

Happy November everyone!!! Can you believe it's November already?!?  Fall is officially in full swing and the temperature is FINALLY getting a little "cooler" around here (In Florida, that means anything below 90 degrees!!!).  


"Forever Love" with Pink Paislee "Secret Crush" Paper Collection
I'm here today to share a wonderful layout I made for my November Creative Monthly Project Challenge over at Colorful Creations.  Your challenge this month is to create any type of project using BLING!!!  That's it!!! You may use as much, or as little as you like.... As long as I can see it, You're in it to win it!!!  
Here's a layout I made using various types of bling:


I used papers and embellies from the "Secret Crush" paper collection, as well as trim by Petaloo and a doily die-cut which I misted using pink Glimmer Mist!  Flowers are from Heidi Swapp and Recollections.  Most were also misted to my desired color.  The butterflies are also by Recollections and again, misted (seems to be a theme here!!!).  I added bling under the flower cluster by the photo and "my homemade bling" under the butterfly, as well as the bling on the butterflies themselves!  Isn't she too stinkin cute?!?  
Here are some close-ups:


"Vintage Voyages" with Graphic 45 "Steampunk Spells" Paper Collection
Another project I've put together is called "Vintage Voyages" which was made for my "Once Upon A Theme" Challenge over at Sketches4All.  This month, your challenge is to create a project (of any type) using the theme "Adventure".  
Here's a look at what I came up with:


I used the Graphic 45 "Steampunk Spells" Paper Collection and embellies, as well as chipboard by 7 Gypsies, and various flowers by Petaloo, Heidi Swapp, and Recollections.  I did a LOT of fussy cutting here... All the pattern flowers that match the coordinating paper behind the background die-cut were fussy cut from a piece of coordinating paper.  I fussy cut ALL the balloons as well.  I also used metal by Tim Holtz, bling by Prima, and of course my favorite, liquid pearls!!!  
For the chipboard word "remember", I started by heat embossing black powder in certain portions of the word.  Then I sanded most of it down and spritzed it with Glimmer Mist.  I finished by adding a light coat of Perfect Pearls and topping it with Liquid Pearls.  Here's a close-up:


Just an FYI... I will be posting WINNERS for my "Enabler" Giveaway tomorrow and have more exciting news to share in just a few days so stay tuned!!!  

And don't forget the Holiday Hop going on at Sketch N Scrap!!! Every day is a Holiday for the hop and there are TONS of prizes to be won!!!! Stop in and check it out if you haven't already :-)

Well gang.... Thanks soooo much for stopping in and have a LUCKY day :-)


Tuesday, October 29, 2013

Make Your Own Bling!!!!!!! Save TONS of Money!!!!!

Happy Tuesday everyone!!!  Today is Tuesday Tutorial Day at Colorful Creations and I'm up for the bid!!!  I found this FABULOUS tutorial on the Frosted Design's Website and decided to share it with all of you!!! This really should be shared with every crafter who likes to use bling, but hates to spend money on all those beautiful swirls!!!

(If you haven't stopped in for my "Enabler" Giveaway yet, there's still time!!!!! Click HERE for details!!!) 

Making Your Own Bling with Liquid Pearls or Puffy Paint

Here's what you'll need:
~Flourish Bling Template (I downloaded several images just by "Googling" "flourish bling swirls" into my browser)

~Transparency (I usually use what I have... All clear stamp packs usually come with two pieces so I keep one as a "spare" for special projects.  Some embellishment packs come with some as backing for the adhesive pieces.  Just keep them when you're done with the package in case you need it in the future!!!)

~Liquid Pearls (Silver, Pink, and White used here), Puffy Paint, or something similar

Start by choosing which swirl templates you are going to use.  Here are some of the ones I found online, then printed onto cardstock at a height of about 5.5 inches.


These are the two I choose to use:


Now you're going to adhere your transparency right over top of the paper.  I used double sided tape, then cut off any excess.


Start to fill in the "dots" using your Liquid Pearls (puffy paint, or something similar), trying to keep them the same size as the "dots" on the template so that it all blends well at the end.  (If you mess up, DON'T WORRY!!!  It will wipe right off the transparency so you can fix it!) Here's a look:


This is what it should look like before you cut it out:


Set your "BLING" aside until dry.  (Liquid Pearls don't take very long to dry so I waited about thirty minutes, creating more bling in the process!!!)

Once the bling has dried, remove the paper behind the transparency and "fussy cut" your bling out, getting as close to the bling as possible so you don't see any excess transparency.  You may use scissors or a craft knife.  I tried both and found that my Cutter Bee scissors worked far better than my craft knife and I was able to get closer to the bling.  I used my craft knife to get in the "hard to reach" areas!  

Here's what it will look like when you're done:


Isn't it beautiful?!?  And it costs nearly nothing to make!!!   Here are all the ones I made using the two different templates.  I have SEVERAL more to make though, and believe me, I WILL!!!!!


I hope this helps you in your future crafting and thanks to Frosted Designs for showing us how it's done!!!  

Well gang... Thanks for soooo much for stopping in and have a LUCKY day :-)


Sunday, October 27, 2013

There's Still Time to Enter the Giveaway!!!!! Graphic 45, 7 Gypsies, Studio Calico, and more!!!!

Just a reminder:  There's still time to enter the "Enabler" GIVEAWAY!!!  If you haven't stopped in yet, click HERE to check out the details!!!  A simple comment can enter you to win over $25.00 worth of FREE SCRAPBOOKING GOODIES!!!!!

Here's a "peek" (Yes, there's more!!!  This is just a tease!!!):

AND.... Since I surpassed the 100 follower milestone (Thank you ALL!!!!) , I'm going to draw TWO LUCKY WINNERS!!!!!   

Want a "peek" at what else is up for grabs?!?  Like Graphic 45?!?  How about 12x12 papers from their "Steampunk Spells" paper collection?!?  Here's a look:

Not to mention other goodies by 7 Gypsies,  Studio Calico, and more!!!  

So what are you waiting for?!?  STOP IN NOW before time runs out!!!!

Well gang... Thanks soooo much for stopping in!!! Have a LUCKY day :-)


Monday, October 21, 2013

Making "Spook-tacular" Projects with Cricut!!!

Hello again my crafty friends!!!!  I recently held my annual Halloween party for the kiddies this past Saturday and wanted to share some of my "spook-tacular" projects made using my Cricut Expression 2 and various Halloween Cartridges.  It's amazing what you make with just a little bit of cardstock and some creativity!!!!

"Handmade 3D Coffin Favor Boxes" cut from the "Happy Hauntings" Cricut Cartridge
First, I wanted to show you a wonderful way to make your favor boxes really creative!!!  Using the "Happy Hauntings" Cartridge and some "Black Magic" Coordinations cardstock (Black on one side and colored on the other), I cut out the 3D coffins at 7.5 inches (just big enough to hold all the goodies I wanted to put inside!!).  Here's a look:


After assembling them, I cut what was supposed to be the "bottom" layer out of some K&Company Halloween themed cardstock, made it smaller so that it would fit neatly on the top piece of the box, inked the edges with black distress ink, and adhered it to the top of all the pieces.  This is what gave them their different designs :-)
The, I just had fun embellishing them all with different embellies and various ribbons!!!  Aren't these just adorable?!?  Here are some close-ups of them:


"Beware" Handmade Spooky Halloween Banner made using "Happy Hauntings" Cartridge
I really wanted to make a banner using the "standard" Halloween colors, but wanted something a little different for the font.  Luckily, the "Happy Hauntings" cartridge has a "Bloody Font" feature that worked PERFECTLY for this!!!  I went with a triangle banner instead of a pennant banner (which is what I almost ALWAYS use!!) because I thought it would look better with the theme!  I also embossed the letters using the "polka dots" embossing folder for a little added detail.  
Here's the finished banner:


"Creepy Spiders" and "Flying Bats" using Cricut Free Cuts!
Throughout the month of October, Cricut also had several "spooky" themed cartridges as their "free cuts" for a week and boy did I take advantage of it!!!  Here are some spiders I cut using the "Spiders" Craft Room Exclusive:


Another "Free Cut" was from the cartridge "A Frightful Affair".  From that one, I made the spider webs above and several bats in various sizes and placed them throughout my house.  I only adhered the middle of the bats to the wall and pulled the wings outward to make it look like they were "flying"!!!  I also tore up a piece of black cardstock until it looked almost circular and made it look like a "hole" in the roof!!!  Here's a look:


Using the same bats but in a smaller size, I made a "bat banner" that extended the length of my living room.  I used eyelets (should of used brads for more "play" but I will know better next time!!) to connect them all and tied them to the columns in my living area.  It was hard to photograph it but you can see a little bit of it here:


And here:


"Wall Size Skeleton" using Cricut Movable Monsters Cartridge
Lastly, I used the "Movable Monsters" Cartridge that I purchased LAST YEAR and NEVER used to make a wall size skeleton!!!  I used the "Whitewash" line of Coordinations cardstock for a more "real" look (not soooo bright white!) and cut all pieces at 11.5 inches.  Here it is:


Isn't he cute?!?  Can a skeleton be cute?!?  Hahaha!!!!  I used left over black cardstock from the banner I made to fill in his "blank spots"!!!  This time, I used brads to attach all the pieces and double sided tape to attach him to the wall :-)

(P.S.  Don't forget... There' still time to enter the GIVEAWAY for your chance at some fabulous goodies!!!  Click HERE for details!!!)

Well gang.... Thanks soooo much for stopping in to see my "spooky" creations!!!!  Have a LUCKY day :-)


New Card Sketch and Holiday Hop at Sketch N Scrap: 2 Broke Girls Sketch # 25!!!

Happy Monday everyone!!!!  Today is Monday, October 21st... Know what that means?!?  That means that the Holiday Hop is in FULL SWING over at Sketch N Scrap!!!!  Every weekday, from now until November 8th, our wonderful Design Team will be inspiring you with TONS of Holiday projects, from New Years to Christmas, and everywhere in between!!!  Hop on over at check it out!!!

(There's still time to enter my GIVEAWAY!!!!! Click here for more details!!!!) 

"Fright Night" Handmade Halloween Card using MME "Haunted" Papers
Sketch N Scrap also has the new car sketch up and running.... Take a look at Card Sketch # 12:


Here is my "Halloween Inspired" card:


I used various papers from the MME "Haunted" paper pad and embellies by K&Company, Martha Stewart, and Jolees.  Very simple, and "cutely" spooky!!!!


"Together Forever" Wedding Scrapbook Layout
2 Broke Girls also has their new sketch up!!!!  Here's a look at sketch # 25:


And here is a layout I made for my cousin's recent wedding gift (I added photos of MY wedding ONLY for purposes of this photo... They were removed and this layout was placed inside a shadow box as their gift!!):


The colors of the wedding were a bright blue, red, and white.  It was also a "country" style wedding so I wanted something that brought that out as well.  These papers were PERFECT!!!!! I just so happened to have some photos that would match the overall "theme" of the page and put them in for the pic!!! 

The papers are by Recollections and Cloud9 Design, as well as basic red and white cardstock.  The "lace doily" paper in the back was cut using the new Edge to Edge cartridge on my Cricut Expression 2.  I cut a circle in the center so it left me with just the outside piece.  I outlined all the papers with a Silver Paint Sharpie for added detail and stamped various "banner" stamps from Hero Arts in Silver Brilliance Ink for the banner at the top.  I finished the banner with some silver liquid pearls (LOVE this effect!!!).  I added flowers from Petaloo, Recollections, and Paperhouse Studios.  The chipboard title is by 7 Gypsies and was heat embossed with silver embossing powder, then also topped with liquid pearls in white.  The small wooden piece hidden in the flower cluster is Studio Calico.  

Well gang.... Thanks sooooo much for stopping in!!! Have a LUCKY day :-)


Saturday, October 19, 2013

Sunday Funday Giveaway Sneak Peek!

Happy Saturday everyone!!!! I hope you are all having a wonderful start to your weekend!!  Today I am hosting my annual Halloween party for the kiddies so I have SUPER busy this week but I did want to share a little something with you!!!

Here's just a "peek" at what will be included in the Sunday Funday Giveaway!!!! Don't fret it... There's still time to enter... Stop in and check it out!!!  AND.... Since I'm nearing 100 followers, if I get to that milestone I will send out TWO RAKS so your chances of winning have almost doubled!!! Be sure to tell your friends in the "scrapbook community" all about it!!!  

Any who... Here's a little something to motivate you:

There's goodies like 6x6 paper pads by Studio Calico and Crate Paper, Chipboard alphas and Flourishes by 7 Gypsies, a huge set of Fiskars Sentiment Stamps, and more ( like maybe various colors of bakers twine and other products from a little someone called "Tim Holtz"!!!!)  

So if you haven't stopped in yet, there's still time!!!!  

Have a great weekend everyone!!!

As usual, thanks soooo much for stopping in gang... Have a LUCKY day :-)


Tuesday, October 15, 2013

Deconstructing Kraft with Frosted Designs!!!!

Happy Tuesday my fellow crafters!!!  I am here today to share a beautiful birthday card I made for my Step Mother!!!  

(If you are here for my GIVEAWAY please click HERE!!!!!)

"Dream" Handmade Card using Prima "Delight" Collection
I recently received a WONDERFUL prize package from Barb over at Frosted Designs, FULL of all kinds of Prima "Delight" goodies!!!!  Since I had a card to make for my Step Mom, I decided to put this collection to good use!!!  I used this week's card sketch from Deconstructing Jen and combined it with the Frosted Design's Friday Challenge "Kraft,  Flair, and Chipboard"!  
Here is the sketch:

And here is my card:


I had SOOOOOO much fun playing with this collection!!!!  There are so many goodies that I had to add almost all of them!!!  
I started by using Kraft-Core cardstock by Tim Holtz and Coordinations as my base.  I LOVE this line of paper!!! It comes in a ton of colors and they are already distressed looking!!!  

Then I just layered papers from the collection, using the sketch as a guide.  I added the Chipboard title "Dream" which was inked, misted with gold glitter mist, and then topped off with liquid pearls for added detail.  The wooden clock is by The Little Yellow Bicycle, heart brads from the collection, and my Flair is hidden in the coral colored flower at the base!!!  I have Prima flowers that were manipulated and inked, misted, and dried until I got my desired effect.  I have another flower from Petaloo also.  I topped it all of with various trims, a wooden butterfly button, and pearls that I colored using my PP2 Spectrum Noir Alcohol Marker.  
Isn't it lovely?!?   I absolutely LOVE this collection and can thank Frosted Designs for sending me such wonderful "goodies" to play with!!!!  This is also my inspirational card for my Creative Card Challenge over at Colorful Creations!!! Be sure to stop in and check it out!!!

Well gang... Thanks soooo much for stopping in and have a LUCKY day :-)