So it's been hectic around here trying to finish up these wedding and bridal shower invites for my good friend Karen, but you know I always find time to create other projects!
I'll start by showing you a page I made for last week's Guest Designer (Jenessa Franco) over at Colorful Creations. We were given this sketch to work with...
I decided to turn the sketch 1/4 turn counter-clockwise. These are pics of my Father and Brother on Father's day this year.
I used papers from a DCWV paper pack I recently purchased that were perfect for these pics. I had some chipboard letters lying around so I painted them white and added them to the title. The colored letters are made by Thickers. I added some twine, buttons, and under the sea embellies to finish off this Gone Fishin' page!!!! I found it hilarious that I took this picture (unbeknownst to my dad and brother) of them both doing the same thing in opposite directions! Perfect "Father and Son" type photo!!!!
I also completed the September 15th sketch for Sketchers, and combined it with Milly's "Use your Stash" challenge at Colorful Creations. This is the sketch we were provided (it's beautiful!)...
And here is my take on the sketch...
Isn't she darling?!? I decided to scrap photos of my youngest daughter's second birthday party last month. She absolutely loves blowing bubbles, although she usually ends up with them in her mouth, and burping bubbles for the remainder of the day!!!!
For Milly's challenge, we were to use:
- Solid Paper
- Pattern Paper
- At least three buttons
- Tags
- Title
- A punched Border
- Wet medium
My husband has decided that he wants a bookmark collection, for all those books he reads!!!! So, I have a new hobby to pursue!!!! I am a HUGE fan of anything Tim Holtz makes, including products and projects. Since his vintage embellishments can take on a masculine look, I thought they'd be perfect for his bookmarks!!
Remember, I started a mid-month scraplift challenge over at Colorful Creations where you pick someone else's project idea, and copy it! Stop in and check it out!
I came across this beautiful tag by a woman name Linda Cain. Boy, is she AMAZING!!!!! OMG!!!! I could steal all of her ideas!!!! If you enjoy the "Tim Holtz" look of things, you should stop by her blog and see her wonderful work.
Anyway, this is the tag that she created...
And here is my take on it...
The colors actually look a lot like the original in person, but photos always show a different hue.
I used Tim Holtz Distress inks in Wild Honey, Spiced Marmalade, Barn Door, Rusty Hinge, Forest Moss, and Black Soot. I tried to get them as close to the original as possible. I then spritzed a light spray of water once I inked it to make the colors blend a bit better. It also gives it a misted look, which is really neat. The inks react with water, and are sooooo versatile. I also used various Tim Holtz stamps, including the famous "Umbrella Man" and his quote "Live the life you've imagined". I wanted to show off the metal quote more, so I covered small spaces of the stamped one with vintage embellishments. I also added a gear, which I attached with a metal brad, colored with Tim Holtz Alcohol inks. I finished it by adding metal stickers to mimic the original. Isn't it just wonderful?!? I LOVE it!!!!!!!! And so does my husband :-)
And last on my list is a card I made for my friend's mother, who is going through some very difficult times. I thought receiving a card in the mail might bring a smile to her face, if only for a brief minute. We could all use a pick-me-up sometimes!
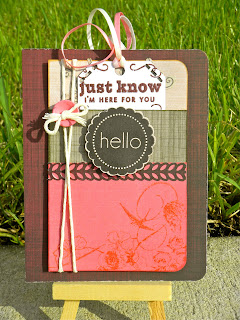
I started with a standard A2 card, and covered the front with various Cloud9 Design papers, following a sketch by page maps (and a challenge for Sketches4All). I also used this as one of my cards for Paula's wet embossing challenge at Colorful Creations, embossing the stamped design on the bottom of the pink colored paper and the sentiment on the tag insert. I used a Martha Stewart border punch to make a small border with the same paper used as the background. I wanted to make a pocket on the front, and this sketch was perfect for that challenge! I made a small tag to insert, adding a sentiment and some ribbon. I added some twine (it appears I'm addicted!), a button, and a sentiment to finish it off. I'm very pleased with how this came out!!!!
And here is the original sketch...
Well, as usual gang, thanks sooo much for stopping in!!!! Have a LUCKY day :-)


My dear Brandi this is one amazing post, so much eye candy to look at!!! Love your take on the sketchees, the tag is stunning and I just love your take on my challenge. Thanks ever so much for playing I just love it!!!
ReplyDeleteOf course!!!! I love playing along in the challenges... it keeps me busy!!! And your work inspires me to do great things :-)
ReplyDelete