June 2014

June 2014
Showing posts with label wood veneers. Show all posts

Thursday, May 1, 2014

Guest Designer Layout for Scrap and Play Challenges!!!

Hello to all my crafty friends!!!  It's a very hot and very humid day here in the Sunshine State!!!  Hope you're having beautiful weather wherever you may be :-)

"Fly" with 7 Dots Studio "Cold Country" Collection
I'm on the blog today to share a layout I created as a Guest Designer for a new challenge site called Scrap and Play Challenges!  I was given the following sketch to work with:


I used the 7 Dots Studio "Cold Country" Collection from the Frosted Designs Store to create this layout:


I LOVE love LOVE this line!!!!  Aren't the paper just gorgeous?!?
I started the page by creating a die-cut using one of my Super8 punches.  I distressed the edges lightly, then used Dusty Concorde Distress Ink and a waterbrush pen to create the purple hue around the edges.  I finished it off with black distress ink for more contrast against the background paper.  
Then I used various pieces and inks to create circles around the page:


I used a Spectrum Noir marker to add a purple hue around the photo as well, then went over it with my White Uniball Pen from the Frosted Designs Store!


I added various Petaloo and Prima flowers to the corner of the photo, tucking in some Tim Holtz Film Strip ribbon in areas.


I misted some trim with Lindy's Stamp Gang Starburst Pearls mist until I achieved the color I wanted, then tucked it under the photo for contrast against the purples!


There are several quote stickers included with this collection, so I chose a few and added a small poem at the bottom!  


I finished the page with Studio Calico wood veneer stars that were colored using White Dylusions spray!!


Well gang...  Thanks so much for stopping in and have a LUCKY day :-)

 photo 84c064ac-ab01-4e94-bb12-3b3893d8f8eb_zpsabe08004.png

Friday, April 11, 2014

New Handwriting Challenge at Frosted Designs!!!

Hello all!!!  It's time again for another amazing challenge over at Frosted Designs!!!

This time around, your challenge is to add handwritten journaling to your project!!!  This can be a title, sub-titling, journaling, doodling, etc....  There is also a requirement to add either paint, inks, or mists to your project!!

I used this AMAZING sketch from Let's Get Sketchy as my base (Sorry it's sooo small and blurry!!!!):


I just so happened to have photos of my youngest daughter's third birthday handy so I decided to scrap those!  
Here's my layout:


I just love the pop of color from the buttons against the black background!!  And this collection from Elle's Studio has quickly become one of my favs!!  It truly is perfect for scrapping "Everyday Moments"!
I started my page with black Bazzil cardstock and scored the lines of the sunburst into the background.  Then I just added various buttons from my collection in groups!


Aside from the buttons, I kept the page pretty simple!  I didn't want to take away from all the buttons by layering up a whole bunch of papers and embellishments!
I used the Kraft Sticker Letters by Elle's Studio and colored them with a Black Sharpie marker.  I also used some Spectrum Noir Markers to color some Thickers I had in my stash to match the colors of the page!


I added some of the wood veneers from the Everyday Moments" pack and used gesso mixed with Ranger's Alcohol Ink in Buttercream to add some color to them.  I misted them with Lindy's Stamp Gang Glitz Spritz for some shine!


I finished my page with some Liquid Pearls and tiny bling dots!!!


Well gang!!!!  Thanks soooo much for stopping in and have a LUCKY day :-)


Saturday, March 8, 2014

Elle's Studio "Everyday Moments" with Frosted Designs!

Well hello everyone!!!  I hope you are enjoying your weekend so far!!!  Looks like it's going to be warm and sunny here in Florida :-)

I'm here today with a couple of projects I've made using the new Elle's Studio "Everyday Moments" Collection!!!  I knew as soon as I saw this one that I just had to have it!!  The colors are truly amazing and are really perfect for "Everyday" type photos :-)

"You Are My Sunshine"
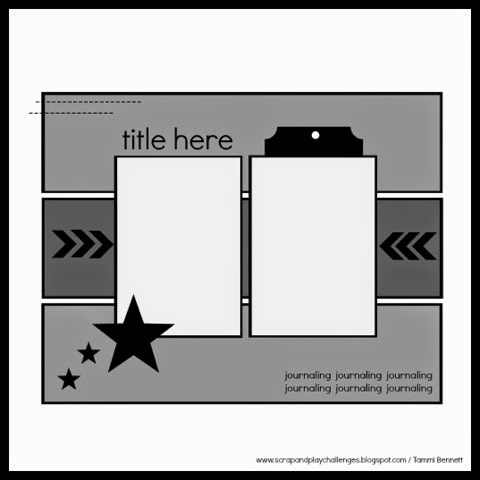
Let's Get Sketchy is currently hosting a blog hop with lots of sketches and tons of inspiration!!!  First, I completed a layout using a sketch by Brenshevia for her challenge.  
Here's the sketch:


And here is my layout:


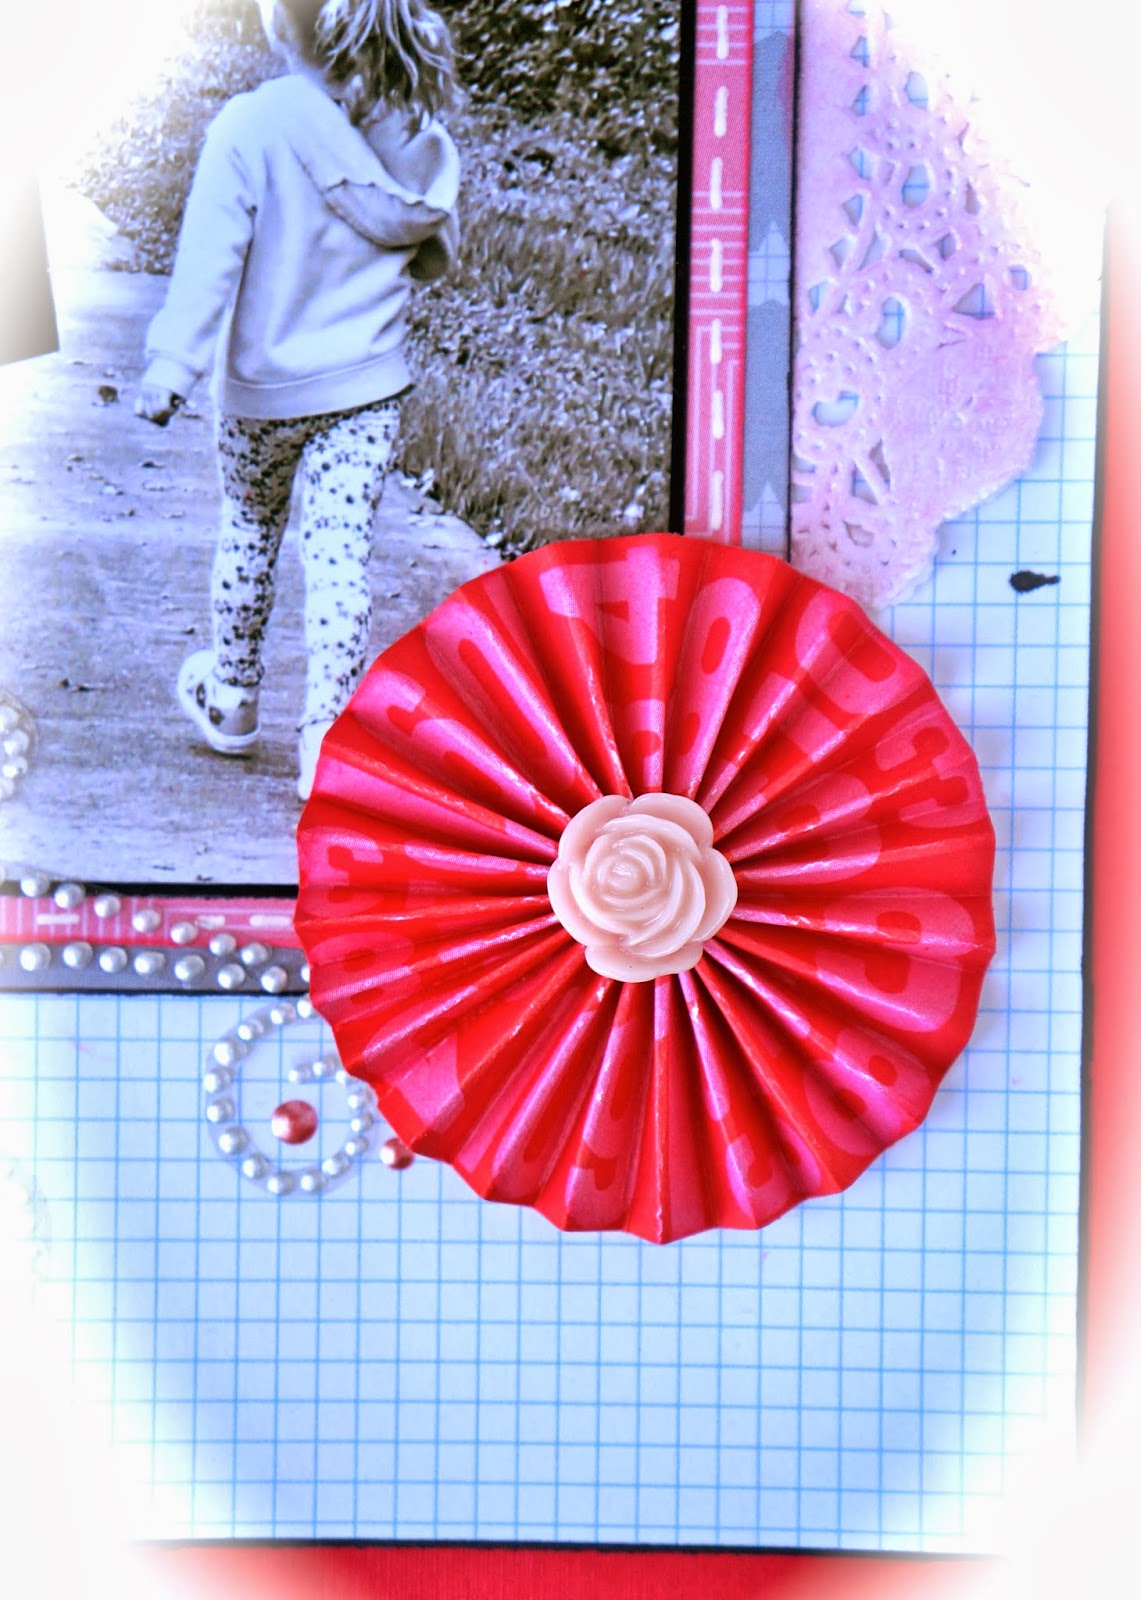
Aren't these papers just adorable?!?  And they are absolutely PERFECT for scrapping my girls, but the collection comes with plenty of blues and greens for "boy" pages as well!!!
I started by using the Heidi Swapp "Hexagon" stencil and various distress inks for my background.  Then, I just layered my papers to follow the sketch, outlining each one with a black sharpie marker.  I also added a thick black line around the photos to simulate a black photo mat!


I used the coordinating Kraft Sticker Letters and Pink Paislee Colorwash letters to create the title "You Are My Sunshine"...


I LOVE adding rosettes to my pages... Especially ones with pictures of my babies!  I cut up thin strips of the 12x12 paper and scored it at every quarter inch.  Then, I just adhered the edges together and push down!  I added one of the resin flowers to the center from the American Crafts Flea Market set in the store to finish my page!


"Time With You"
I also completed a card using this collection using another sketch by Brenshevia.  This one was for Melinda's Challenge.

Here is the sketch:


And here is the card:


I used Kraft Core cardstock by Coordinations as my base (one of my FAV papers for backgrounds!) and started layering on paper!   I kept everything pretty simple as I have a tendency to over-embellish :-)
I used the coordinating wood veneers by Elle's Studio and used the Tim Holtz paint dauber from last month's kit to add some color.  


I also used the white gel pen from last month's kit to create faux stitching around the grey star paper (this was a requirement for this challenge!).  I finished the card with some red-stitched ribbon and a tiny bow!!!


"Sisters"
Last, but certainly not least, is a layout I created a few backs back.  I posted it to our Facebook page here, but decided to share it here in case you haven't stopped by!  
For this one, I used the "Stuck?!" Sketch from last month.  Here's a look:


I really like how this one came out!!!  I used various products from the store to add to the detail of this page!

I started by adding some black Dylusions Mist to my background, by pulling out the spritzer and lightly tapping it in the direction I wanted my splatters.  


I added strips of paper from the collection, various pieces that I fussy cut from the papers, and added a small tag I made and some washi tape behind my photo.  I outlined some things (like my photos and background paper) with a black sharpie, and added ink to the edges of the rest of the papers.  


I added some homemade bling to my page using a template, liquid pearls, and acetate.  


I used my Lindy's Stamp gang mists to add some color to the coordinating Elle's Studio wood veneers and added them to the page!


I finished this page with another handmade rosette, again topped with the Flea Market resin flowers by American Crafts.  


Well gang...  Thanks sooooo much for stopping in today!!!  I hope I've inspired you to create something fabulous with this collection!!!  Have a LUCKY day :-)

 photo Brandi_zps9c46318b.jpg 

Products from the Frosted Designs Store:

Monday, February 24, 2014

Altered Altoid Tin ~ Frosted Designs "Love Is..." Mini-Series: Part 2!!!

Hello all!!!  WOW... Has it been a busy month!!! I've been making all kinds of wonderful Valentine's projects and I just can't stop!!!  I'm in love with all the pretty papers and embellies :-)

Altered Altoid Tin with Pink Paislee "Colorwash" Collection
So earlier this month, I shared with you a card for Channa's "Love Is" Challenge at Frosted Designs which featured a beautiful , soft color scheme.  Here's a reminder of the colors in case you forgot!!!


I was so in love with these colors and overall challenge, that I actually made several coordinating projects for a Valentine's gift (Yes, it's girly... But my husband is use to it!!! Hahaha!!)
Here's a peek at the card I posted:


And my "hidden" pocket with a tag that quotes:
"Love is that condition in which the happiness of another person is essential to your own"
Robert Heinlein


The Pink Paislee "Colorwash" 6x6 paper pad was perfect for this challenge!!! I had so much fun with it that after completing the first project, I just wanted to keep going!!!  So that's exactly what I did :-)

I've seen a few posts in the past about "altered Altoid can" and found them interesting.  I wanted to give it a shot...  So I did!!!  
Here's a look at the finished project:


I love this hexagon paper in the pad... it's very versatile!!! And the Kaisercraft blooms really make it beautiful!!!  I sprayed the blooms with LSG mists in Cotton Candy Pink and Tibetan Poppy Teal,  using Dylusions White Linen spray as a "base coat" for the teal to make a more muted color.  I really like how the "always" sentiment came out! I actually stamped it with a light color, then went over it with my black Sakura Gelly Roll pen which gives it a glossed-over look!


I decided to create a mini photo-book to go inside the can as well.  I simply cut a paper down to 3.5x10 inches and scored at every two inches.  Then I just matted other papers and photos, dressing it up much like a page or card!


I used the wooden heart and word "love" from the Polka Dot Party Word Veneers by American Crafts, and coated them with Blazing Sun, Cotton Candy Pink and Sunset Pink Lindy's Stamp Gand Sprays. Then I cut up the word to spread it across the book.  I also added Studio Calico "tiny stars" which were treated the same way, only I added small splatters of Dylusions white linen spray on them :-)


You can see the two-tone color and shine here... it's fabulous!!!


For the back side of the book I wanted pictures of my family.  So after much digging to find the "perfect" size, I was able to find some pics that looked great with these colors!  I added some MME "tiny word stickers" and DIY Thickers topped with "Rock Candy" Distress Glitter as well!!!


I had to keep the inside pretty simple, and flat... definitely flat!!!  My little book was quite thick after embellishing and I didn't want it to be squished!!! Hahahaha!!!  So I added a tiny banner and the definition of "love" (created in powerpoint and misted with LSG sprays!) to finish it off!


Stay tuned for "Part 3" of my "mini-series" coming soon!!!!

Well gang...  Thanks so much for stopping in and have a LUCKY day :-)

Products from the Frosted Designs Store: