June 2014

June 2014
Showing posts with label bo bunny. Show all posts

Monday, September 15, 2014

Somewhere in Time with Colorful Creations!

Hello everyone!!!  It's that time of the month for a brand new sketch up over at Colorful Creations!!!

Here's a look at the mid-month sketch:


I used a whole slew of goodies from previous Frosted Designs Kits to come up with this masculine page:


This picture of my husband was taken from our balcony aboard a cruise ship on our honeymoon!  It's one of my favs of him :-)

I started with some papers from the "Enchanted kit" and added a large circle die-cut which was misted and inked.  I grabbed the wooden ATC card by Prima from the "Capture the Moment" kit and misted it with Lindy's Stamp Gang Starburst pearls, inked the edges with distress ink, then added black splatters using Dylusions spray!


I'm a HUGE fan of Creative Embellishments chipboard for a number of reasons:
The styles they offer, the "alterability" of the chipboard without losing it's shape, and the overall look it adds to ANY project!  So I grabbed some gears and my title (both from CE) and started to work on them!  I used "white picket fence" Dylusions spray to give them a white coat, then added various LSG mists for a distressed look.  I finished them off with a dab of crackle paint for texture :-)


I even added some to the clock that was printed on Prima paper, then fussy cut and added behind my photo!


Here's a look at the title using the same techniques!


The page looked quite simple to me so I added additional gears and sprockets, using brads from the "Capture the Moment" kit to hold them down, and Tim Holtz rub-ons from the Enchanted kit in various circles!


No page is complete without flowers so I threw on some flowers by Prima and Recollections to finish it off!


Well gang... Thanks so much for stopping in and have a LUCKY day :-)

 photo 84c064ac-ab01-4e94-bb12-3b3893d8f8eb_zpsabe08004.png

Thursday, July 10, 2014

Somewhere In Time Layout + Snapguide Tutorial with Frosted Designs "Enchanted" Kit!!!

Hello again my crafty friends!!!  Just popping in to share a wonderful layout created using this month's "Enchanted" kit from the Frosted Designs Store and a quick tutorial on using the Distress Crackle Paint included in the kit!!!

First, let's altered some chippies!  I am a HUGE fan of the Creative Embellishments chipboard... It's durable, easy to alter, and extremely beautiful!!!  So I grabbed a couple pieces from my stash and went to work!  This is my first tutorial in Snap Guide so bear with me!

Check out How to Add Texture to Your Chipboard With Crackle Paint! by Brandi Matos on Snapguide.

I also used the following picture as inspiration from the July challenge over at Creative Embellishments:


And here is my layout!
I took several pictures of my daughter on Halloween of last year.  She was so anxious to be a "purple tooth fairy"!  I made her wand and costume, then took tons of pics and printed them in color and black and white!  This was my first attempt at an accordion fold on my paper so please be nice...  This paper gave me an excellent opportunity to do this!!!


Isn't my "baby" so beautiful?!?  I don't mean to brag but I just can't help myself sometimes :-)

I was totally inspired by the beautiful blue hues in the inspiration photo, the color of the pineapple (these papers and flowers were perfect for that color!!), the beauty of nature behind the main focal point, and those big, luscious flowers in the drinks!!!  

I started by creating the fold on my paper, then heavily distressed the sides with the teal Prima inker and my distress tool.  I also used a chevron cut file from A Cutt Above The Rest to create a stencil, then sprayed black Dylusions ink from the store over it right down the center of my page!  I grabbed some of the Tim Holtz rub-ons from the kit and added them around my page :-)


I fussy cut several elements from the papers in the kit and added them around my page!  I also added several embellies, including the resin clock, Maya road trinket, and the beautiful Petaloo flowers!  I added additional Prima flowers from my stash and even tucked one inside the large bottle cap from the kit!


I finished my page with the yummy chipboard pieces from Creative Embellishments that I altered in the above tutorial!  They were painted, heat embossed, then inked!


Although this is my first try at the fan fold on one of my pages, I assure you, it will not be the last!


Well gang...  Thanks so much for stopping in and have a LUCKY day :-)

Products used from the Frosted Designs Store:


Saturday, July 5, 2014

July's "Enchanted" Kit Challenge at Frosted Designs!!!


Hello there everyone!!!!  For all my Americans, I hope you had a fabulous (and safe) 4th of July!!!!

I'm popping in today with a project for this month's kit challenge over at Frosted Designs!  Here's a look at all this yumminess I had the opportunity to play with:


Can I say fabulous?!?  Seriously... In love with these papers!!!!  As with all of our kit challenges, all you need to do is create a project, ANY TYPE OF PROJECT, using ANY Frosted Designs kit and share it with us here, or on our Facebook page!  It's that easy!!!  At the end of the month, we will randomly draw a winner for that month's prize!!!

Speaking of prizes, this month we have a fabulous one lined up from our friends over at Scor Pal!!!!!!

Scor Pal will be providing a surprise Magnolia Package to one lucky participant of this month's kit challenge!!!! Stop by their site for all their fabulous projects perfect for all your crafting needs!!!!


Now onto my project...  I found this fabulous key cabinet at an outlet store and decided to give it a makeover!  Here's my finished piece:


Isn't it darling?!?  I just LOVE the colors!!!!
I started by coating the entire cabinet with gesso, then applying a heavy coat of the Distress Crackle paint for color.  Once that dried, I added some Smooch Accent in Sundance from the store for some shimmer and added contrast!


I cut up some of the beautiful paper in one inch strips and inked the edges with the Prima chalk in "teal damask" included in the kit!  I added them to the cabinet using some mod-podge and began to embellish!  I grabbed the tiny Petaloo flowers and added them around in various areas, adding some pearl spray behind them.  I clear embossed two of the butterfly stamps using the Prima ink, then colored them in with the same Smooch ink mentioned above :-)


I wanted a small cluster in the bottom right corner so I added a couple flowers from the kit and store, and some other embellies from the kit!  The resin clock was colored using Lindy's Starburst spray in Tibetan Poppy Teal, then coated with gesso, Prima ink, and some of the distress paint.  I added some Smooch to the Maya Road vintage scissors and added them to the cluster as well!


I used other papers from the kit to decorate the box, inking all the edges with the chalk ink!


To finish the cabinet, I grabbed papers from this kit, and paper from the Beauty of Nature kit, and adhered them to the inside with mod podge!  I hung one of the keys from the kit just for show ;-)


And there you have it!!!  Just one of many ways you can use your kit!  We have a BRAND NEW Kit Team lined up with some fabulous inspiration this month so stay tuned!!!!!  

So what are you waiting for?!?  You have until noon, August the 3rd to submit your projects!!!!

Well gang...  Thanks so much for stopping in and have a LUCKY day :-)
Happy Scrapping!

Products used from the Frosted Designs Store:


Friday, May 17, 2013

Scrap Your Story Challenge #12


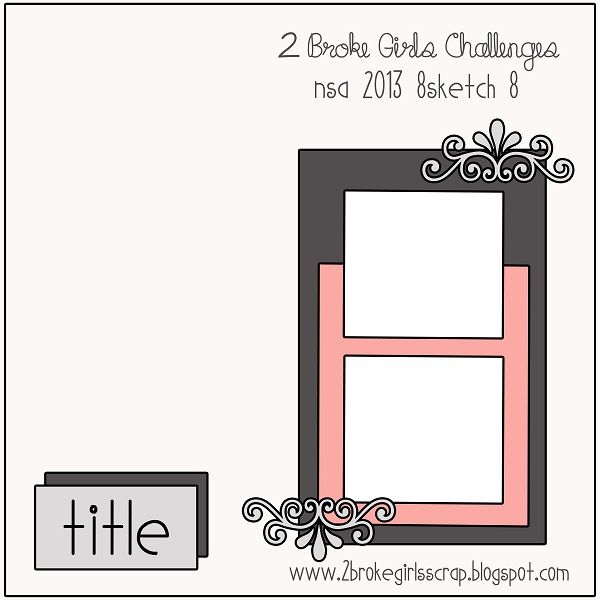
Happy Friday gang!!! Ready for another exciting challenge from Scrap Your Story?!?!  This week's challenge is stamping and boy, did I have fun with it!!!!  I combined this challenge with Janet's NSD Sketch #8 over at 2 Broke Girls.  Here is the sketch:


And here is my take on it:


I  started by using some gesso, distress stain, and various flourish stamps to create my background.   Then I layered it up with papers by MME and Bo Bunny Mamarazzi 2 paper collection.  I also used Heidi Swapp stamps to make "words" around the page: "Fabulous", "Hello", "Remember Today" and "Having a Great Time" were all stamped with Stazon ink in random places.   The embellies are also from the Bo Bunny collection, aside from the bigger stars next to the word "Smile" which are grungeboard that I embossed and inked with distress inks.  There's a lot going on here but I think it turned out wonderfully!!!!!  


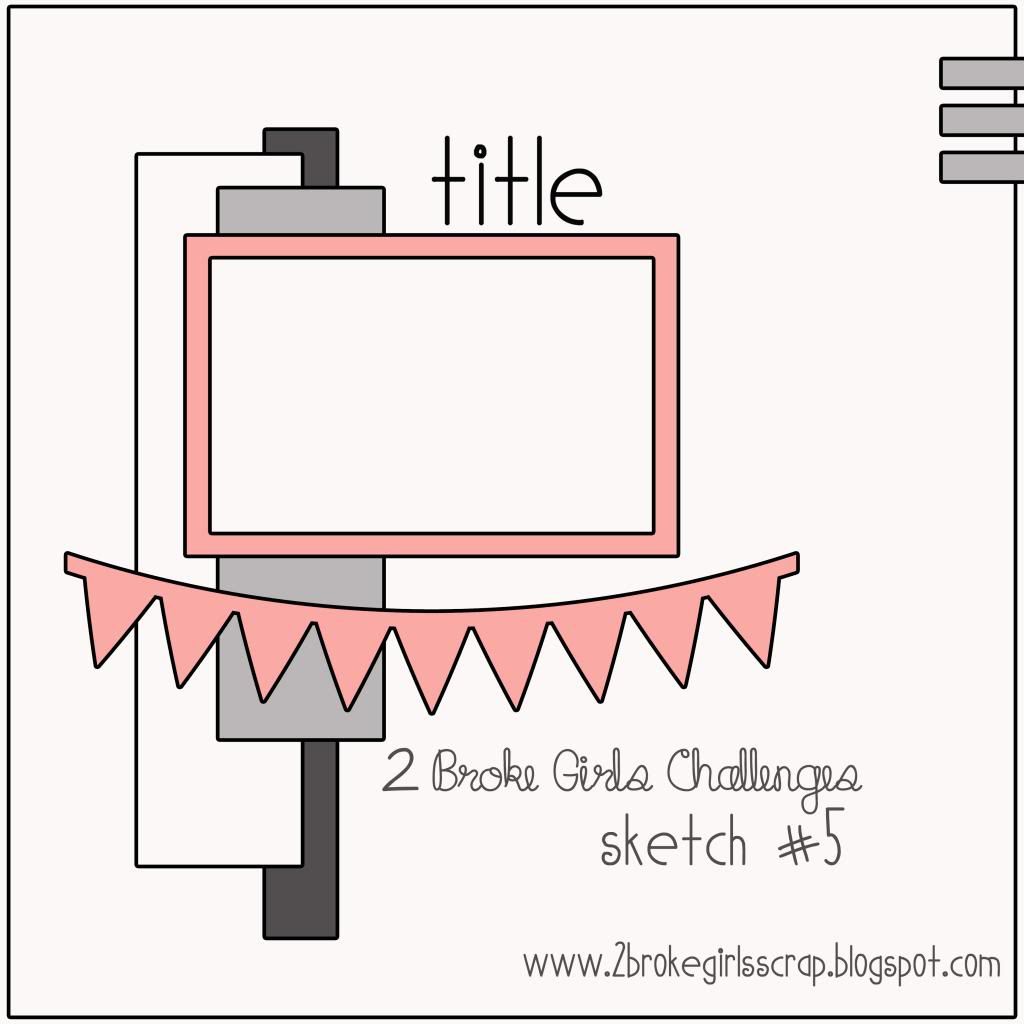
I also made another page with a picture from our recent cruise vacation!! This was taken at the port of call in Ochos Rios Jamaica.  This is my Aunt, Uncle, Father, Step Mom, Husband, and daughter, respectively.  I also created this for Sketch #5 at 2 Broke Girls.  Here is that sketch:


And my page:


I used papers by Momenta, and the top one by K&Company.  I cut the cardstock stickers into banners for a little more detail.  The die-cuts are from The Girls Paperie, "silver anchor" by Jolees, and wooden ticket by Tim Holtz.  This truly was "The Great Escape".  Actually, the greatest of them all!!!!! 


And last, but not least, is a card I made for my Mother In Law for Mother's Day this past weekend using the May 15th Card Sketch from Sketch N Scrap.  I received some papers and embellies by Pink Paislee Cottage Farms collection and they were perfect for the "type" of card I was trying to make!!! Here is the sketch:


Staying true to the sketch, I merely added some detail with layering (one of my fav things to do!!!) and embellies.  Here's my creation:


Pretty?!?  I put one of my Martha Stewart punches to work, added some ribbon, pins, and button by Prima.  Easy enough!!!! And I LOVE the look!!! 

Well gang, that's all for today!!! Don't for get our month long BIRTHDAY BASH over at Sketch N Scrap and month long SKETCH A THON over at Colorful Creations!!! Plenty of inspiration to get those juices flowin' and bring home some prizes while your at it!!!!

Thanks soooo much for stopping in and have a LUCKY day :-)