June 2014

June 2014

Thursday, February 28, 2013

Scrap Your Story- Challenge numero uno!!!!!!


So... Speaking of SYS.... The first challenge to tackle was to create a layout using only one photo.  Easy peasy, right?!?!?  I decided on scrapping a photo of my husband and youngest daughter on her very first trip to Disney World!  She was enamored with all the excitement and couldn't take her eyes off of Mickey and all his friends :-) I happened to take a really cute photo of her sitting on daddy's shoulders as she watched one of the many shows and thought it perfect for this challenge!!!!!
Here is a sketch by Brenshevia that I used to create this layout:

And here is my page...


Isn't she adorable?!?!?! 
 I started by using papers by DCWV Rustic Stack (I absolutely fell in LOVE with them as soon as I saw them!!!!) and used my Cricut Expression 2 to create the die-cut.  Of course, everything I make gets distressed so there's plenty of distressed edges and ink!!!  I used a vellum quote by DCWV also for the title and thickers for the bottom portion.  There are other various embellies by K&Company and Soft Spoken.  
I typed my journaling on my computer then printed it paper from the same paper stack and cut it in strips, then inked the edges for definition.  I have to say, I am very pleased with this type of journaling :-)  

Here are some close-ups of the journaling...


It's Amore!

Afternoon my nifty crafters!!! I have a quick page to share with you guys :-)
I FINALLY finished my page for my Creative Monthly Project Challenge at Colorful Creations that starts TOMORROW!!!! Hahahaha!!!! And... I decided to use the February sketch over at Cest Magnifique to complete it!!! Here's a look at the sketch...
 
Isn't is BEAUTIFUL?!?!?  I was so excited to play wit this one.  There is just so much detail! 
So after choosing the sketch I wanted to work with, I had to decide on what my challenge for the month would be.  And I decided DETAIL would be the challenge.  This sketch just gave me so much inspiration to add layer, upon layer, upon layer of papers, flowers, and embellishments.  Here is my final page...
 
 
Isn't it so pretty?!?!?  I wanted to do a "love" themed page so I decided on red, black, and white (one of my FAV combos to work with!).  I chose various pattern papers from the Bella Armoire stack by DCWV to make my page.  I found a chipboard circle in my stash and added strips of various red papers around it with mod podge.  Then I used my Cricut and my Oriental Iron 2 cartridge to create the black and white die-cut in the background.  After I got that down on the paper, I just started to play!  I used my new Spellbinders Spiral Blossom 2 die to make a couple of layered flowers, adding decorative pearls and brads to the center to finish them off.  Other flowers are by Recollections, aside from two Petaloo colorable flowers that I misted with Distress Stain and Perfect Pearls.  I also added two Prima buttons that I tied twine through.  The number squares in the corner by Basic Grey spell out "I Love You" in numbers :-)  The title "Amore" is by K&Company and I heat embossed it with Garnet embossing powder to match the color scheme.  Doesn't it look "lovely"?!?!?!?
 
Well my friends, thanks for stopping in... Have a LUCKY day :-)


Wednesday, February 27, 2013

Basic Grey "Hey You" Blog Challenge Candy Revealed!!!!

Just a reminder to get those projects in for my Blog Challenge before midnight tomorrow night for your chance to win some fabulous new goodies by Basic Grey!!!!! Here is a photo of part of the prize package...


The new "Hey You" collection by Basic Grey including the 6x6 paper pad, eclectic buttons, printed chipboard alphas, printed chipboard shapes, and flags!!!! Also a set of standard size tags by Ranger and Cosmo Cricket Tiny Text!!!!!!  Hurry up and get those projects in... What are you waiting for?!?!?!?


Tuesday, February 26, 2013

All White and Deconstructed!!!!!

Hey there everyone!!!! Yes, another post for the day!!!! A little sunshine finally came my way and I was able to take some needed photos :-)
I was able to finish the Deconstructed Sketch # 90 and combine it with Stacy's Card Challenge to create this monochromatic card!!! The challenge was to use the following sketch for Deconstructed, and use only white (for Stacy's challenge).  Only the sentiment can be in color.  I have NEVER taken on the task of an all white card before.  I've seen how beautiful they can be but didn't think I could "make it work"!  Any who, here is the sketch:


And here is my card!!!!!  I am actually very happy with the way it came out!!!!! 


I started by cutting a 5x7 sheet of embossed "leafy" paper and adding a "faux" corrugated board paper on top.  I used the same leaf paper to make my squares, and added a piece of white canvas, cut into a banner, on top.  I actually stamped my sentiment on the canvas, for a different look!!!
I purchased the "leaf" ribbon just a few weeks ago and have been anxious to use it and thought it would go great with the leaf paper :-)  I added some small white roses, that I "tainted" with just a bit of "Spun Sugar" distress ink and some butterflies I made using my EK Succes butterfly punch.  
I hope you enjoy this as much as I did  :-)

Thanks again for stopping in!!!
Have a LUCKY day :-)


Scrap Your Story- Seriously!!!!!

Hello again!!!! I have some VERY exciting news to share with you guys today.  I have been chosen to be on the Design Team for Scrap Your Story:  An exciting new blog with weekly challenges and opportunities to win some fabulous prizes!!!! Be sure to stop by and check out all the lovely and talented Design Team members and show them some love!!!!! 

I also wanted to share with you a layout I completed this week for Sketch-N-Scrap's sketch # 27.  This one was really fun to work with :-) I also combined this challenge with Roulien's Counting Blessings Challenge over at Colorful Creations!  
Here is the sketch....


Since I already had my Disney photos out, I chose two more from the pack to complete this page.  Another photo of my youngest daughter on daddy's shoulders, and my oldest having the time of her life on the Flying Carpet ride!!!!!
I rotated the sketch a quarter turn counter-clockwise and this is what I came up with... 

I recently purchased the Neapolitan Paper Pad by American Crafts and just couldn't wait to use it!!!! Everything about it is just adorable!!!!  All the embellies are by American Crafts, including the cute little jar of hearts on the right side!!! I made a pinwheel with some paper and vellum and had it coming out the top :-)
For the balloons, I used my 1.5inch circle punch and cut three different pattern papers, inked the edges, and added some hemp cord for the "strings".  I did some paper scrunching on the bottom, and again did my journaling using my computer and coordinating paper.  
Here's a close-up of the paper scrunching... I actually added brown polka-dotted vellum to the top of the green paper and inked the back using various distress inks so it wouldn't be white.  


Well gang, as usual... Thanks soooo much for stopping in and have a LUCKY day :-)


Friday, February 22, 2013

Hello Kitty Cricut Ideas!!!!!

Hello again :-)
I was in the process of making some party decor for a customer and decided on making these beautiful rosettes.  I cut the images using the Hello Kitty Cricut Cartridge and several sheets of pattern paper! I thought they would be a great idea for any type of "Hello Kitty" party!!!! 

I started by cutting several 4inch strips of pink Coordinations cardstock and scoring them at every half inch.  Taking four of the 4inch scored papers, I glued them together at the ends until I made a circle.  I pushed in the center to make the rosette then added a piece of cardstock and some hot glue to keep it down.  I cut the center white circle at 5inches and embossed it using the swiss dots embossing folder and my Grand Calibur machine :-)

I cut out the Hello Kitty images at 4.75" in width and 7" in height.  I used various pattern papers to make the balloons then added her to the top of another smaller rosette.  This rosette was made using three 2" strips, scored every 1/4 inch and then glued all together.  Aren't they just darling?!?!?!
Here's some more pics to give you an idea as to how they'll look at your next party :-)


Well gang, thanks soooo much for stopping by and have a LUCKY day :-)


Spunky Desktop Calendar Box... Free Tutorial Included!!!!

Hey there gang!!!! You know I am always busy cooking up some great new projects so I thought I'd take some time from my day (what little I have) and share one of them with you :-)

For Valentine's Day, I wanted to make something for my Daughter's Teacher that was different than most gifts.  I came across a Desk Top Calendar Easel Box that looked PERFECT for the task at hand!!!! I also used Tabitha's February Inspired Challenge to give me inspiration for the color theme.  Her photo had "Spunky" written all over it and that's just what I wanted to accomplish!!!!! Here is what she gave us to draw inspiration from...

Why not give it a shot, right?!?!?  And so I began... and what seemed to be a very easy project turned into a project of all out perfection!!! 

I started cutting, scoring, and putting all the pieces together and everything looked very nice.  However, I was not satisfied with the actual stability of the box.  I wanted something that would hold up through the years.  So I added cardboard to all the pieces and wrapped even more cardstock around it!!! 

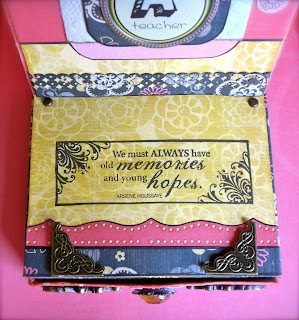
Once the box was together I worked on all the details.  I added some borders that I punched with my EK Succes Lattice punch, and of course inked the edges of anything and everything that went into this project :-)  I added the sentiment from a Bravissimo package I found at Joanns like forever ago!!!! I also added two metal photo corner pieces to hold the calendar in place once it's in.   I also stamped the top of the box (which will be under the calendar piece) with a quote that reads: "We must always have old memories and young hopes".  I attached two small brads at the top of the box to make sure the calendar stays in an upright position.  The calendar piece will help with that also.  


I wanted some detail on the drawer so I used a large gem brad made by The Paper Studio that I Picked up at Hobby Lobby, added some springs and hot glue to the back, giving it some depth so that you can actually grab it to pull out the drawer!  The flourishes are made my Jolees Boutique and are actually brass plated plastic pieces.  I think they look great though :-)


For the calendar months themselves, I found free templates online and used Powerpoint to customize them and get them down to size.  I printed them out on alternating coordinating cardstock and then adhered them to a piece of cardboard for sturdiness.  And of course, I inked the edges!! Hahahaha!!! Real surprise there :-)

I also wanted some "motivational" quotes for each month so I stamped the back of them with sentiments.  Here's a peak...


Here's a view of the box opened and with the calendar months inside.  They were a perfect fit :-)

And here's a final peak at the whole box together.  The easel card stands up so you can see the calendar, but also folds down as a convenience.  I just LOVED all these colors together and how the box came out.  


I truly hope the teacher appreciates this as I just had so much fun creating it :-) 
Here's the link to a free tutorial if you decide you want to make one for yourself!!! I have to warn you though... they are addicting!! I'm already working on me second one for my husband :-)

Well, gan... as usual .. Thanks for stopping in and have a LUCKY day!!!!!!! :-)


Thursday, February 21, 2013

March Crop

Hey gang!!! Just an FYI... Colorful Creations is hosting a "Pot Of Gold Crop" running from March 8th-10th.  Details coming soon!!! I will keep you posted at they come out :-)
Pot Of Gold Crop

Monday, February 18, 2013

Scrap Your Story

So, I just wanted to let you guys know about a brand new site opening up called Scrap Your Story.  They provide weekly challenge sketches and a monthly winner so be sure to stop by and check them out!!!!

Thanks for stopping in and have a LUCKY day :-)

FYI Websters Pages Giveaway!!!!!!

That's right!!!! Webster's Pages is having a giveaway with FIVE chances to win Brand New Stamps from Allison Kreft Designs!!!!!!!! Here are the AMAZING new stamps....