June 2014

June 2014

Tuesday, May 20, 2014

New DT Announcement!!!

Hello everyone!!!  I'm popping in to share some wonderful news!!! 
 
Starting June 1st, I will now be on the DT for Color Me Scrappy!!!   CMS is a wonderful challenge site with gorgeous color combos that have a small twist (varies per challenge!).  I am VERY excited to be part of the super talented and amazing team!!! 
 
Stop by their blog to see their current challenge and play along!!! 
 
Well gang...  Thanks so much for stopping in and have a LUCKY day :-)
 photo 84c064ac-ab01-4e94-bb12-3b3893d8f8eb_zpsabe08004.png

Card Sketch #26 at Sketch N Scrap with Simple Stories "Homespun" Collection!!!

Hello everyone!!!  It's time for another amazing card sketch at Sketch N Scrap!!!  

Here's a look at this week's sketch:


I used the Simple Stories "Homespun" Collection to make a card for my daughter's teacher! 
Here's the card:


I've always been a fan of Simple Stories... Their collections are very versatile and can be used to create all sorts of projects!!!  

I kept the card relatively simple because I was making a number of projects at the same time!  This sketch was perfect for making a recess window card and that's exactly what I did!  


I created my "window", then layered on several stickers and die-cuts from the collection!


I just love the colors!!!!  I finished the card with some hemp cord threaded through a chipboard heart (I punched holes with my Crop-A-Dile) and tied in a bow!


A simple, but adorable card to show my gratitude for such a wonderful teacher!


Well gang... Thanks sooo much for stopping in and have a LUCKY day :-)

 photo 84c064ac-ab01-4e94-bb12-3b3893d8f8eb_zpsabe08004.png

Saturday, May 17, 2014

"Homespun" Gratitude Projects for Teacher Appreciation Week!!!

Hello out there to all my crafty friends!!!  We celebrated Teacher Appreciation week earlier this month and I made quite a few things to show my gratitude!!!  My daughter's teacher is absolutely amazing and it has truly been a pleasure working with her this year!  I can only hope that each year will be the same :-)

Altered Mason Jar 
Aside from sending in some standard school supplies that were needed in the classroom, I made some items sure to put a smile on the teacher's face!  She's a fan of Starburst candies and gum.  I had a mason jar lying around that was begging for some attention so I decided to put it to good use!
Here's a look at the finished jar with the Starburst candies inside:


I used the Simple Stories "Homespun" collection from the Frosted Designs Store for most of the projects.  I just love the patterns and colors!  I cut some strips, inked the edges, and wrapped them around the jar.
I created the sentiment in Powerpoint, printed it in red ink, then attached it to the top of one of the doilies in the die-cut pack.  I used pop-dots to add it to the front of the jar for dimension!

I finished the jar with a couple more pieces of paper and some red twine!

See how sweet life can be?!?!  Hahaha!!!!


 "Exploding" Box!!!
The next project was a very simple "exploding box" that I found while browsing the web for ideas!  I didn't have any directions but it looked pretty self-explanatory!

I started by cutting down a piece of cardstock to 9x9.  I scored it at 3 and 6 inches (3 inches for the center and sides!), then turned it 90 degrees and did the same!  Then, I cut off the four "outside" squares to leave just the center of the box and four side.  I taped some gum packs to the sides, then folded it up!

For the lid, I cut a piece of cardstock to 4x4 inches, then scored at one-half inch and 3.5 inches (this gives you a three inch center and half inch for all the sides!).  Then, just as I did for the box, I turned the paper 90 degrees and did the same.  There you have it!!  Easy as that!!! 


Now once the lid is removed, the sides fall out to show the wonderful goodies on the inside!!  Sweet!!!!


 Chalkboard Canvas Board
Now, the last project...  Yes, I really did save the best project for last!!  I created a wall hanging for the teacher to add to her wall décor in the class! 
Here's a look:

I LOVE it!!!  This took some time to do only because I had to wait for the paint and other mediums to dry over and over again.  Patience is not my strong suit when crafting so this was a challenge for me!!!!  Hahahaha!!!! 
I started by priming my canvas board with gesso, then adding several coats of Chalkboard paint (having to wait for them to dry in between!).


After drying was complete, I used the white uni-ball pen in store to create hand-drawn borders around the canvas.   

I mixed up some Luminarte Paint in "Wild Rose" and molding paste to create a colored texture for the canvas.  I used the "Live, Love, Laugh" stencil in the "Simply Sweet" kit from Frosted Designs and added my mixture over top!  Once that was dry, I outlined it with the white uni-ball pen for added detail.

I created other colors of molding paste using Lindy's Stamp Gang Magicals to create the flower stem and butterfly.  Using my hot glue gun, I attached a Kaisercraft bloom (pink) to the top of the flower stem for a 3D effect!!  Love it!!!


While everything was drying, I used my Cricut Explore to create a stencil of the teacher's name.  Then I carefully traced inside the stencil lines with the same white pen to finish the piece!!!

 
There you have it!!!  A multitude of gifts to show a small token of my appreciation for such an amazing teacher!!!  God bless her and all the wonderful teachers in this world!!! 
Well gang...  Thanks so much for stopping in and have a LUCKY day :-)
 photo 84c064ac-ab01-4e94-bb12-3b3893d8f8eb_zpsabe08004.png

Thursday, May 15, 2014

May 15th Sketch at Colorful Creations with more of the Homespun Collection!!!

Hey there crafters!!!  It's mid month which means a new sketch challenge over at Colorful Creations!!!

Here's a look at this week's sketch:


Isn't this fabulous?!?!  Awesome :-)
I've been using quite a bit of the Simple Stories "Homespun" line from the Frosted Designs Store so I decided to just keep that going!!  
Here's my layout:


These pics were taken earlier this year at a local park!
I kept the page pretty simple and followed the sketch quite literally!  The colors in the pics went perfectly with the colors of the papers!  I layered them up according to the sketch and inked all the edges with Walnut Stain distress ink for a bit of contrast against the background.  Then I started adding all these fun die-cuts and chipboard pieces!!!


I love the little polaroid frames included with the die-cuts and framed one of the photos with it!


I grabbed one of the burlap flowers from last month's kit at Frosted Designs and added it to the corner of my matted photo with a quote sticker!


I finished with my title using chipboard pieces and sticker letters that come with the collection and an UmWow wood veneer chevron!!!!


I hope you'll have time to play along with us!!!

Well gang...  Thanks so much for stopping in and have a LUCKY day :-)

 photo 84c064ac-ab01-4e94-bb12-3b3893d8f8eb_zpsabe08004.png

Monday, May 12, 2014

First Attempt at Art Journaling... Already Hooked!!!!

Hello crafty neighbors!!!  Hope you're having a fabulous start to your week :-)

I'm popping in to share my very first attempt at an art journal page!!! I've seen the pages and LOVE all the different techniques used.  I've followed along with the "Sundays With Sandee" series over on the Frosted Designs Blog for tips, tricks, and ideas!!  I even "subscribed" to Design Memory Craft's blog because I love the inspiration from their fabulous Design Team! So, I finally made a purchase through the Frosted Designs Store to gather some "art journaling" supplies and give it a shot!

I am entering my first Art Journal page to the Design Memory Craft monthly challenge!  The challenge is to use at least TWO of the following (I used the ones in red!):


Stamper's Big Brush pens (I used the Black one)
Gelatos (I chose the "Tropical" pack)
Textural Accents & Tools (Gesso AND Gel Medium)


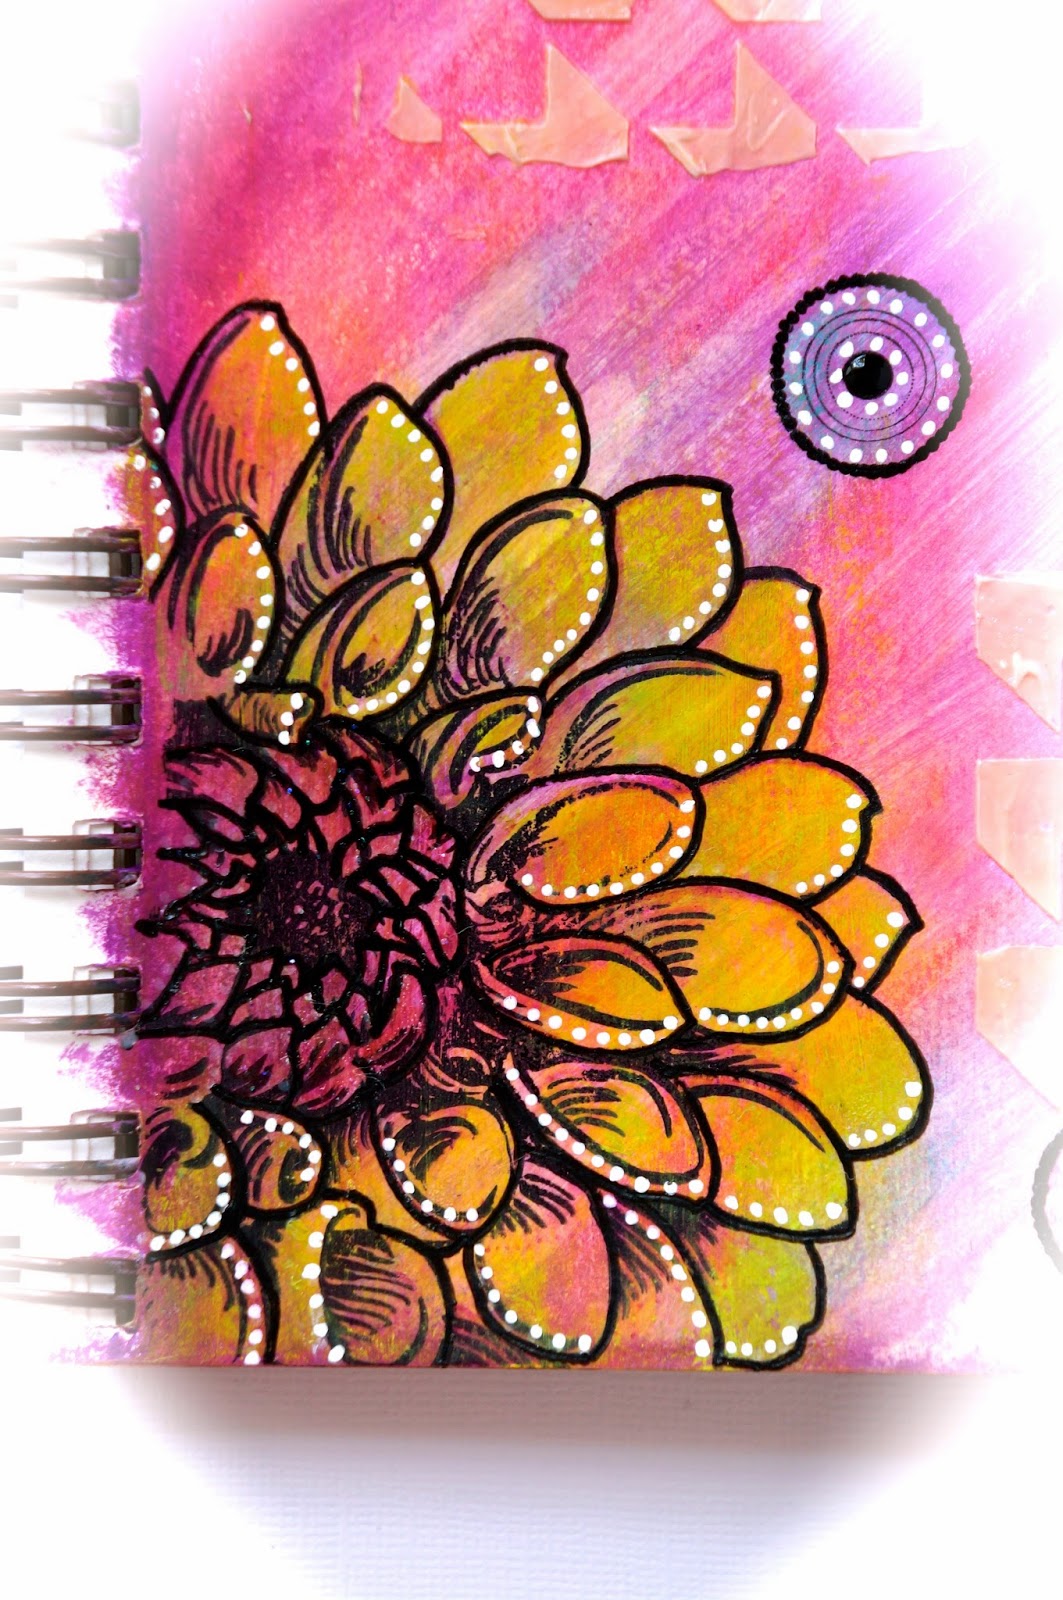
Here's a look at my finished page (I only did one side of the journal just as an "experiment"!  I didn't want to get overwhelmed on my first try!):


I have to admit...  I am IN LOVE with this already!!!  It's actually relaxing to just be able to sit and create freely!!  I can tell that this is the start of something new in my crafty world!!!  Hahaha!!!!
Here's a picture of the items I used to create this page:


I started by priming my page with a coat of Faber Castell gesso.  I took three of the gelatos from the "Tropical" pack (Watermelon, Raspberry, and Snow Cone) and colored randomly over my background.  Then, I took a small paint brush and some water to blend it all together!  Once dry, I used the Faber Castell "Gel Medium" to seal it all in!  I came back and added some texture with a Heidi Swapp mini stencil and some molding paste! 


I have tons of stamps... TONS!!!!  I use them for cards, and sometimes even for scrapbook pages, but now... Oh, now I will be using them much, much more!!!
I chose a large flower stamp by Inkadinkadoo and used a black Stampers Big Brush pen to add it to the corner of my page.  I used the "Margarita Mix" gelato from the pack to color in the flower, then added some shading with one of my Spectrum Noir markers!  I finished the flower by outlining it with a Sakura black Glaze Pen and tiny white dots created using my White Uni-Ball pen from the Frosted Designs Store!


I used another (smaller) flower stamp by Inkadinkadoo and the big brush pen to add a flower to the top right of my page.  I used the "Raspberry" and "Margarita Mix" gelato to shade it in, then added the same effects as the other flower!


I finished my page with a sentiment stamp from a Dylusions pack that was perfect for my first journal page!!!  It reads:
"Until you spread your wings, you have no idea how far you'll fly"


I am soooo excited (and proud of myself) that I finally gave this a shot!!!  I am finding that I am walking further and further away from my "comfort zone" and am loving the results!!!


Well gang...  Thanks soooo much for stopping in and have a LUCKY day :-)

 photo 84c064ac-ab01-4e94-bb12-3b3893d8f8eb_zpsabe08004.png

Let's Get Sketchy Week 2 with Heidi Swapp "Dreamy" Collection!!!

Hello all and Happy Monday!!!  I hope you're all having a fabulous start to your week!

Just popping by the blog to share with you a layout created using the new sketch posted at Let's Get Sketchy and the May "Simply Sweet" Kit from Frosted Designs!
Here's a look at the sketch:


I love the Heidi Swapp "Dreamy" Collection and that just so happens to be included in this month's Frosted Designs Kit!
Here's my page:


These pictures were taken at my youngest daughter's birthday party last year!  
I started my page with a Kraft Core cardstock by Coordination, then layered up my papers according to the sketch!  All the edges got a treatment of "Knotted Wood" ink by Prima that was included in the "Simply Sweet" kit.  I added some burlap that I dyed with Glimmer Glaze (also in the Simply Sweet kit!) and tucked one of the coordinating tags underneath!


I used one of my butterfly punches and the yellow paper from the collection to add some detail down the side of my page.  


The clear word pieces in the kit are AMAZING!!!  I ran them through my sticker maker and added them for my title!


I finished the page with some bling and flowers as well as liquid pearls for added accents!!!


Well gang...  Thanks so much for stopping in and have a LUCKY day :-)


 photo 84c064ac-ab01-4e94-bb12-3b3893d8f8eb_zpsabe08004.png

Thursday, May 8, 2014

Live Well, Laugh Often, and Love Much!!!

Hello to all my crafty friends out there!!!  Just stopping by the blog today to share a Mother's Day card I made using the new Prima Princess collection in store now!!!
I fell in love with the "Live, Love, Laugh" stencil included in this month's kit and decided to carry that theme out across several projects!  Here's a look at a finished card I made for my Stepmom:


These papers (like all Prima papers) are very soft, and always beautiful!!!  They are truly perfect for creating keepsakes for all the special women in your life :-)
I started with one of the 6x6 papers to use as my card base, then distressed and inked the edges with the Prima ink included in this month's kit!  I cut up various papers from the pad, distressing and inking them along the way and layered them up!

The resist canvas borders are absolutely fabulous and work with any project!  I went over it with the same brown ink and added it atop of all the layered papers.  


 I also used the Viva Paper Pen in this month's kit to add accents around my sentiment!


I used the chipboard pieces from the "Beauty of Nature" kit and added a coat of gesso on top.


I finished the card with a burlap flower from last month's kit, some burlap, and a butterfly from my stash!


See how easy that was?!?  Now... Only a handful more to make and I'll be done!!!  Hahaha!!! 
Well gang...  Thanks so much for stopping in and have a LUCKY day :-)