June 2014

June 2014
Showing posts with label mixed media. Show all posts

Thursday, April 30, 2015

CSI Case File 162 for Creative Embellishments!!!!!

Hello fellow crafters!!  Brandi here again with another layout created as guest designers from Creative Embellishments for CSI this month!  Here's a look at the case:


And here is my take (all evidence and testimony is in red):

This is a picture of the hubs and I on our one year wedding anniversary :-)  I used the Simple Stories "Homespun" collection which matched the scene perfectly!!!

I started with a textured solid white cardstock base and lightly splattered black distress ink across the page.  I used a circle stencil from the Crafters Workshop and distress markers to add circles in random areas.  


I mixed some molding paste with Tim Holtz Alcohol Ink in "Butterscotch" until I achieved my desired yellow color, I used the paste mixture over a Tim Holtz Sunburst layering stencil to the left of my photo!


I outlined all my papers with a thin black sharpie (one of my favorite techniques) to help the colors stand out against the all white background.  I used the Circle Bokeh Stamp and Versa Ink to clear emboss the pattern on my chipboard photo frame from the Together Frame Set. After heated, I used Ranger distress ink, Lindy's Flat Black Tornado, and Black Soot distress ink to color the piece. I dried it, then misted with homemade glimmer mist (made from water and perfect pearls) for some  shimmer :-)


I used the same black ink to color the "Love" title from the Everlasting Love title set (the smaller one) and various sticker letters from the collection to make my title (inspired by the "space" theme).  


I did my journaling in the "Q&A" format :-)  


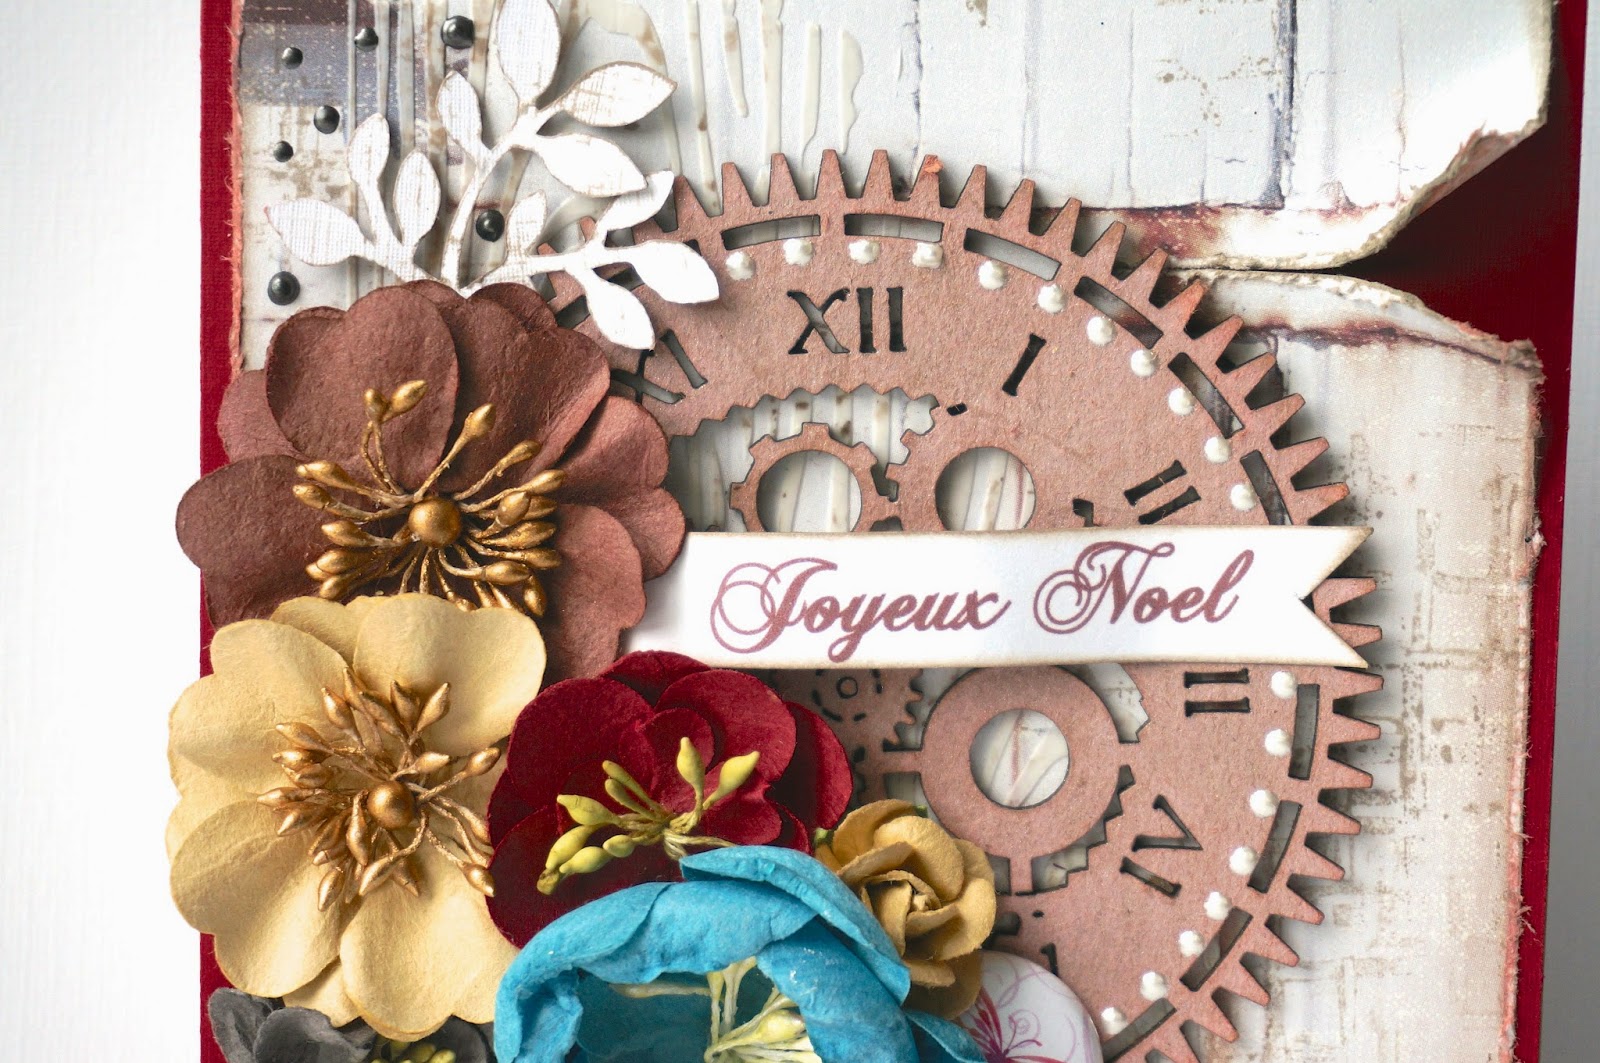
I finished the page with some flowers by Prima and Petaloo, stickers, and die-cuts from the collection! 


Well gang...  Thanks so much for stopping in and have a LUCKY day :-)

brandi

Thursday, February 12, 2015

Designing with Creative Embellishments for Scrap Around the World!!!!!

Hey there folks!!!!  I have some very exciting news today:  Creative Embellishments is guest designing over at Scrap Around the World this month!!!!  Isn't that fabulous?!?!?!?!  

Here is this month's amazing mood board over at SATW:


I LOVE the colors and the overall theme of the board. I used several aspects to create the following page of my oldest daughter:


As you can see, I clearly was inspired by some of the colors (greens, browns, and whites!).  The bottom three pictures give me an overall "explore" feeling so I included that as my title, using the pattern of colors from the boat to color my actual title piece!  I used lots of flowers, drawing inspiration from the first photo, and a "wood" background from the bridge in the middle bottom row!

I used several CE goodies on my page, altering them in different ways!
I started by creating a background using black distress inks and the Binary , Distressed Burlap, and Distressed Checkered   Stamps from the store.

I drew some squares with water color pencils, adding small amounts of water to soften them out, then added a number of nesting Squares around the page, coloring them with different distress markers!

Using a stencil and molding paste, I added some texture to my page, stamping over top for more depth :-)

I used the Explore title from the Adventure Word Set, coloring it with distress markers, then adding a coat of crackle paint in rock candy for some texture!

I finished the page with a big heap of various flowers to throw in some color and girly-ness!!!!!


Well gang...  Thanks so much for stopping in and have a LUCKY day :-)


Sunday, February 1, 2015

Things I Love with for Creative Embellishments with Romance Novel, Chapter 2!!!

Hello all and welcome to a new month!  February is here which means a month full of all the things I love!!!

Today is the 1st which means a new challenge over at Creative Embellishments!
Here's a look at the inspiration photo: (The twist this month is to use an ombre effect on your chipboard/ create a background!)

My two girls are on the top of my list for things I love so it's no surprise I would use a photo of one of them!  
Here's my page:


I used the "Forever Yours" kit from Frosted Designs to create the page and a variety of CE goodies!
I created my background with various stencils, molding paste, gelatos, and Lindy's magicals until I achieved my desired effect!

I added some stamping with the Distressed Checkered Stamp with black distress ink!

I love flourishes and added one from the Flourish 22 set, adding my ombre effect with a number of different gelatos!

I layered on tons of papers, distressing them along the way, and added some liquid pearls for accents!  I finished with a flower cluster and a wooden heart from the Hearts set, adding another ombre effect to that one as well!


Well gang...  Thanks so much for stopping in and have a LUCKY day :-)


Wednesday, January 7, 2015

Mixed Media Canvas with Forever Yours January Kit!!!!

Hey there gang and HAPPY NEW YEAR!!!!  Yes, 2015 is upon us!  Let's make it a scrappy happy year :-)

I'm here today to show this month's beautiful new kit from Frosted Designs as well as a mixed media canvas I made with it!
Here's a look at the kit:


This kit features Prima's "Romance Novel- Chapter 2" as well as goodies from Fabscraps, Petaloo, and much more!

I used the canvas from the kit to create a small wall hanging for a close friend.  Here's a look:


I just LOVE the colors and papers here... Absolutely LOVE!!!!!  I included a brief tutorial on making this as well :-)


And here are some close-ups:


Well gang... Thanks so much for stopping in and have a LUCKY day :-)


Products used from the Frosted Designs Store:


Monday, January 5, 2015

"Fly" Mixed Media Canvas for Creative Embellishments!!!!

Hey there crafty friends!!!  I hope you are having a beautiful start to your new year thus far!!!  I'm popping in today with a mixed media canvas using all kinds of Creative Embellishments goodies!

Here's a look:
canvas1


I started by creating my background using various acrylics, mists, and other mediums.  I even used the Punchinella Panel as a stencil to add some depth into my background!
DSC07943


I sprayed some white mist onto some glossy paper and stamped the Circles Bokeh Stamp into it and added some more pattern around the canvas!
DSC08001


I altered the Spread Your Wings title with some white mist and a purple gelato, adding a gradient effect!
DSC07938


The Steampunk Dress Form 2 was primed, then colored using various gelatos.  I added a tiny amount of Luminarte paint on the main piece, used a white Signo pen for accents, then sprayed the entire piece with homemade glimmer mist! DSC07953


I finished the canvas with lots of yummy flowers, using the Butterfly Flair to fill in spots and extend the message of the piece!
DSC07999


Well gang... Thanks so much for popping in and have a LUCKY day :-)
brandi

Thursday, November 20, 2014

Joyeux Noel for Creative Embellishments!!!

Hello again crafters!!! I don't know about you but the weather here has certainly taken a dip... Cold air is moving in which means winter (and one of my FAV holidays!!!) is right around the corner!!

Today I am sharing a Christmas card I made using some wonderful Creative Embellishment goodies and sketch #111 over at Cardabilities:


Here's a look:


I used this month's Rustic Beauty kit from Frosted Designs (designed by yours truly!!) to create the card.

I first created the background by adding some molding paste through a layering stencil, then doing some "second generation" stamping with the "Distressed Burlap" stamp.


As you can see, the Steampunk Clock is the "main attraction" here on the card. I colored it using some mixed media ink and shimmer mist, then layered up various flowers and die-cuts.


I was also able to sneak in one of the butterfly flair pieces (these make GREAT fillers for ANY cluster!!!) to finish off the card!


Well gang.. Thanks so much for stopping in! Have a LUCKY day :-)


Tuesday, November 18, 2014

Tutorial Tuesday: Altered Tag with Frosted Designs

Hello everyone and happy Tuesday!! It's Brandi here today with a quick mixed media/altered tag tutorial using this month's fabulous Rustic Beauty Kit!!

First, here's another look at this month's kit:

Isn't it amazing?!?!

And here's a look at the tag I created using goodies from the kit:


Isn't it lovely?!? I just love the colors in this kit and the goodies to play with :-)  Here are the steps to create the look!


1.  Grab one of the tags, ink, and something to apply the ink.
1.  Create a base on the tag using the ink and stencil included in the kit.
2.  Using the same ink, go around the edges of the tag.


4.  Grab the marker, stamp, and mini mister.
5.  Color directly on the stamp with the marker and mist a small amount of water.  Stamp over tag sporadically until you receive your desired look!
6.  Add some of the die-cuts from the kit around the tag and distress the edges.


7.  Grab some of the trim from the kit and mini mister.
8.  Mist a generous amount of water over the trim and crinkle it up.
9.  Once dry, unravel the trim and use for bow!


There you have it gang!!!  Can't wait to see what you create!!!!!