June 2014

June 2014

Friday, September 28, 2012

Bridal Shower Decor

I know I posted the invites for Karen's Bridal shower... So I figured I'd share a little of the decor I made for it as well!!! I was pressed for time last week so I was only able to make a banner with beautiful, large paper rosettes.  I went with the standard "bridal Shower" colors (Pink, Teal, and White) and went to work.  I cut the banner using my Cricut Princess Party Cartridge, doubling up with an added layer for support.  The font is from the Type Candy Cartridge, also using the shadow layer.  I then cut several small circles using the Cricut Font and Basic Shapes Cartridge, and added three circles to each letter.  I added some small, adhesive gems for some pizazz, and voila!!!! A beautiful banner indeed :-)
Please excuse the photos as the lighting was very poor :-(  I try to capture all my projects in natural sunlight but was in too much of a hurry to make it happen!!!

And a side view.... 

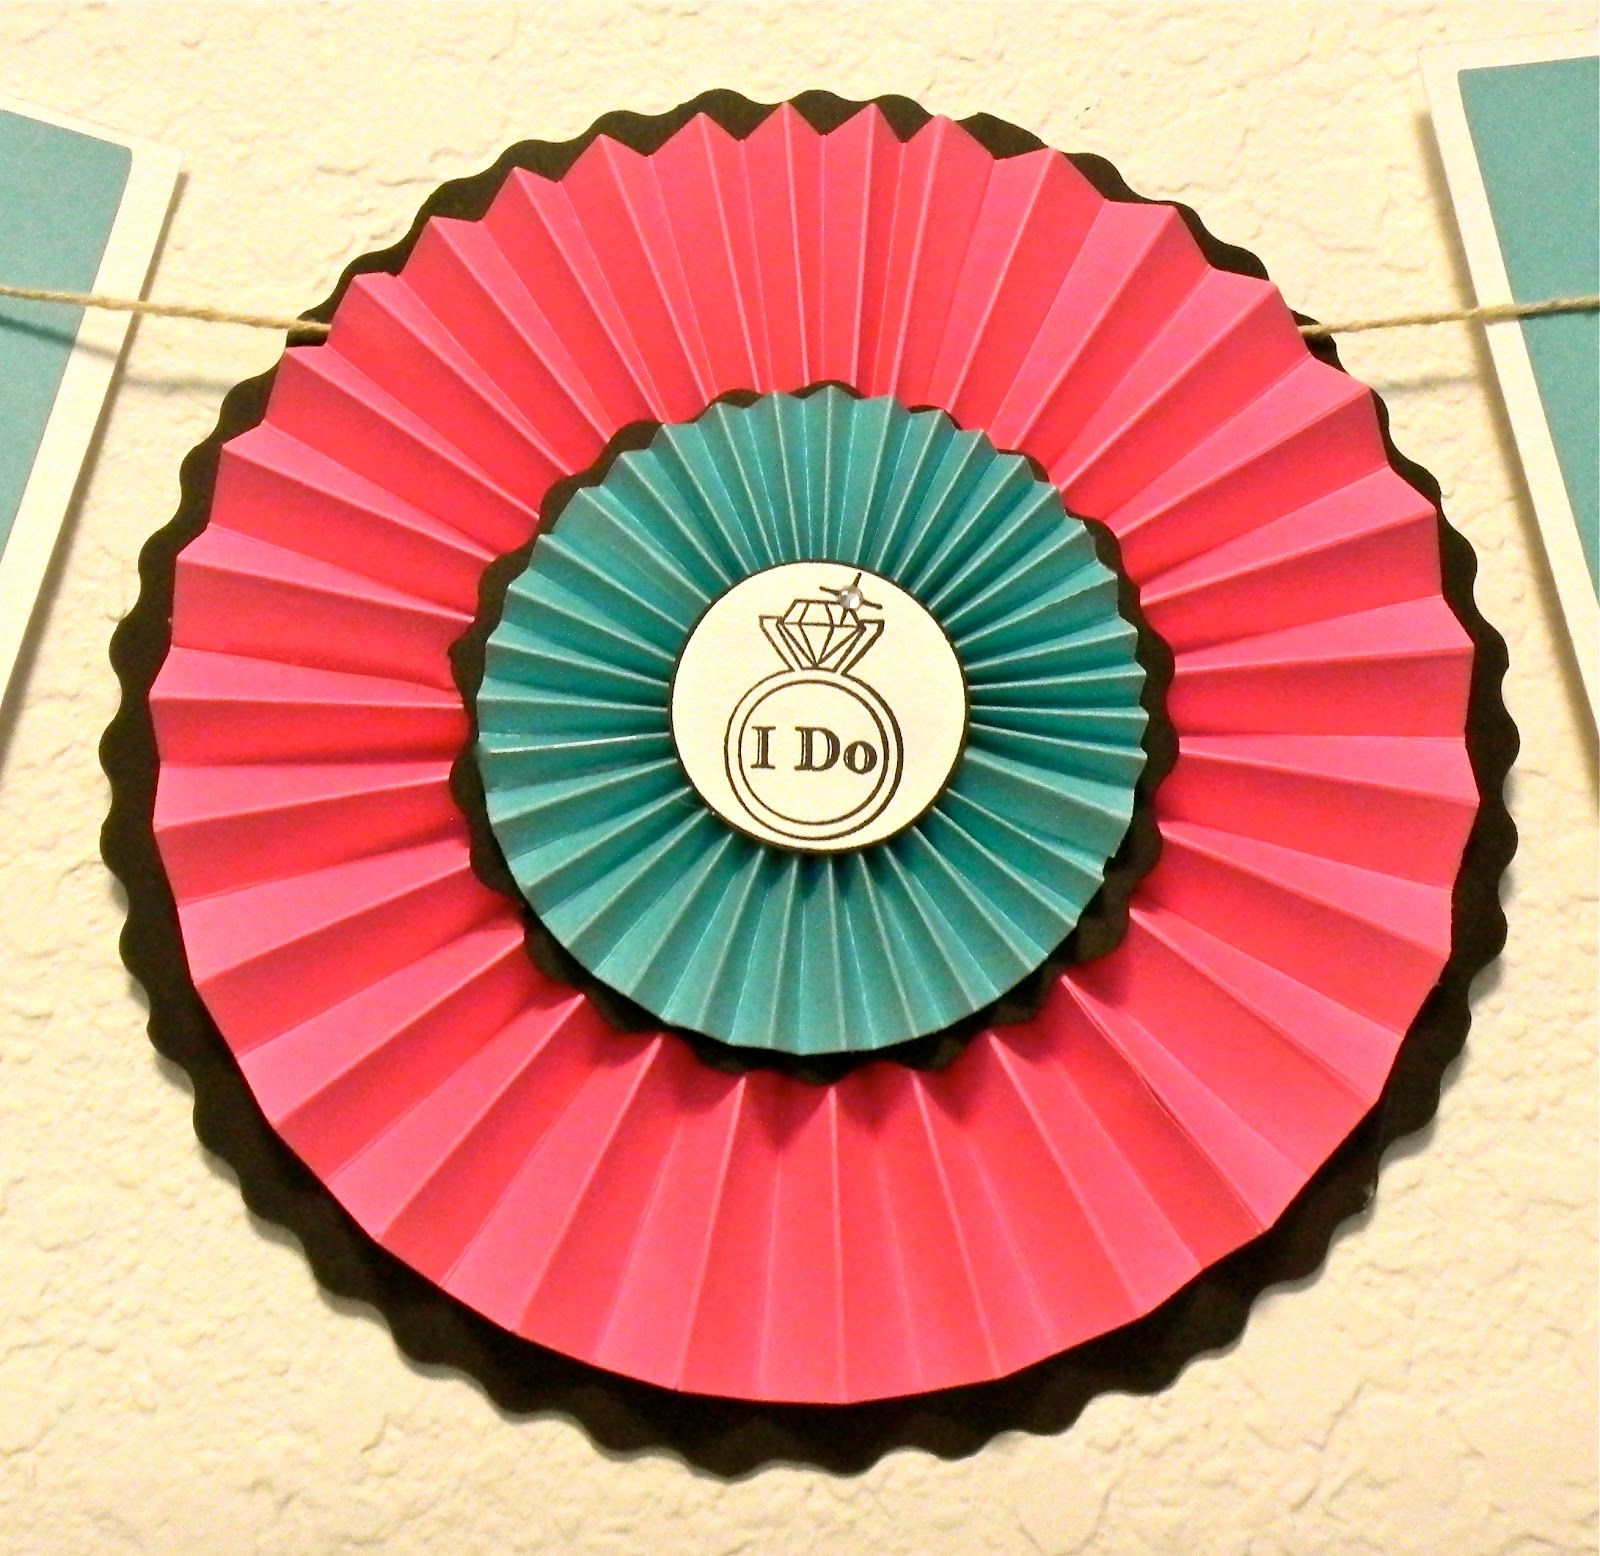
I also decided to add large paper rosettes to the banner to separate the words.  They are very similar to making the smaller ones (check out my previous post here), only adding length and width to get them the correct size.  I believe I cut these at 3 and 1/4 to get an overall width of 6.5 once completed.  The smaller rosette made from the teal paper was cut at 1 and 3/4 to get an overall width of 3.5.  For the big one, I had to cut four 12 inch strips and glue them together.  I decided on using my hot glue gun for this project to speed things up a bit.  I used my Martha Stewart large circle cutter for the outside circles, then trimmed them with "funny cut" scissors (that's what I call them anyways!!!) to make it look wavy.  I added a stamped image in the middle for the final touch and put them between the lettering.  What do you think!?!?


Here are some side views so you can take a peek at the depth of them.


As usual gang, thanks for stopping in and have a LUCKY day!!!!!!!!

Thursday, September 27, 2012

Those closest to my heart!

Hola mi amigos!!! It's been a while but I haven't forgot you!!! It's been hectic as usual but I'm getting into a routine (finally!)!!! I have a few projects I'd like to share with you so take a seat and enjoy the show :-)
First, I'd like to bring to you some photos of my wedding day.  A truly beautiful day indeed, and with many photos to recall all the wonderful moments!  I haven't yet scrapped them all but it's a work in progress :-)
The page I made is a picture from my glorious day of myself and my sister.  She was my "Maid of Honor", and for good reason.  She means the world to me... And she is a beautiful, amazing young woman, destined for great things!!! I also used a sketch on this page as well from C'est Magnifique.  It's a new site I came across with some fabulous artwork.  These people are treu artist, and I feel I don't even come close to their creations... but their work inspires me to try new things!!! I also combined the challenge with Brenshevia's Plus One challenge at Colorful Creations.  The object was to create a page using only purple and white.

Here is the sketch I had to work with....

And here is my interpretation of it... I turned the sketch 1/4 turn counterclockwise to accomodate my photo :-)


I truly love how this page turned out.  It is absolutely one of my favs!!!! The papers are all from Recollections (various paper stacks: Old World Theme and ).  The flowers are also by Recollections and the chipboard is actually grungeboard made by Tim Holtz.  The metal pieces are from Making Memories and the small "button" below the big flower is by K&Company.  Love love love this page!!!!

The next page I made is a picture of me and my husband on a staircase aboard the Carnival Legend (one of my favorite photos!!!).  I love how this photo came out... the photographer really was amazing!!!! I followed a sketch from our Guest Designer Challenge over at Colorful Creations.  I will post the sketch once I find it... I seem to have lost it amongst my thousands of pics on here :-)
But here is my layout... 


Isn't it beautiful?!?! I started by using some new papers I purchased from Michaels by Recollections. It's  themed "Old World Stack" and is full of beautiful, almost canvas like, pages.  I used other various Recollections papers as well, and some die-cuts by K&Company.  I couldn't wait to use a new border punch I purchased by EK Success so I added a couple of borders I made from it!!! I then finished it off with some pleated ribbon and flowers.

Another page I made for a different Guest Designer at Colorful Creations is one of my husband and I at a local State park.  We love to go on nature walks when we have the time to do so!!!  I went very easy on this one and kept it simple.  I read an article that stated "every page you make doe not have to b e a show stopper".  That's my problem!!!! I'm always trying to put so much detail and time in each and every page, but sometimes I have many other things to do .  I decided to give it a shot and still try to make a nice page.  So here it is...


I stayed with neutral colors to keep with the "outside" theme of this page.  The papers are a mixture of K&Company and Recollections.  All the embellies are K&Company (die-cuts, title, wording, border, chipboard, and quotes).  I think it came out okay given the simplicity of it :-)

This week I was also busy making a couple of cards.  The first is for a challenge at Colorful Creations for Fi's color palette.  Here are the colors we were to work with...

And my card...


Isn't it lovely?!?!  I purchased a new Prima stamp and just couldn't wait to use it!!! Hahaha!!!! It's just the cutest birthday stamp I've ever seen :-)
The papers are by MME (My Minds Eye) and 7Gypsies.  Stamp and flowers are by Prima.  The banner was made using various Hero Arts "banner" stamps and inked with a Dew Drop Mocha stamp pad.  I also added a little twine to the banner and lace by Recollections to finish it off.  I think this card is so adorable!!!!

Last on the list is a Thank You card made for Tabitha's inspired challenge at Colorful Creations.  I used a sketch by Pagemaps to get me started.  Here is that sketch...


This is my take on the sketch.


I tried to incorporate all the "fine" details on this card.  I hope you are able to see my interpretation of the sketch in my creation!!!  I used a standard 5x7 card and papers from K&Company, Bazzil, and 7Gypsies.  The embellishments and rhinestones are from a "card pack" sold by Recollections at Michaels.  The stamp is made by Studio G.  I also used a corner punch to add some design to the corner and detail to the card.  I only hope this brighten's someone's day!!!! After all, that's why I do this :-)

Well, it's been fun.  I appreciate you stopping by and looking at my creations.  Have a LUCKY day :-)


Saturday, September 15, 2012

Beautiful Bride to Be

As you probably know, my good friend Karen is getting married!!!!!! I'm SOOOO excited for her!!! She is absolutely the most deserving person of something great and wonderful!  
Since she's on a budget (aren't we all!), I decided to make as many things as possible, to cut down on some pretty heavy costs.  I started with the invitations, then the Bridal Shower invites, and now we're working on the programs.  She's also allowed me to put together her bouquets as I did for my very own wedding! So, without further anticipation, I bring you the Bridal Shower invites!!!!!!
I started by cutting 16 "Bride Silhouettes" using the Wedding Solutions Cricut cartridge.  I used plain white cardstock for the base and first layer, then a pearl white cardstock for the top layer.  I then ran the top layer through my Sizzix, using the "Swiss Dots" Cuttlebug embossing folder. I also added some sheer ribbon under the detail, to mimic tulle.  I topped it off with small, black satin ribbon and a tiny rhinestone.  

And here's a close up...


Then, I cut 16 A2 cards with black cardstock (the wedding colors are burgundy, black, and white), and used a corner punch on all the edges to round them off.  I also embossed the front of the black cardstock with another Cuttlebug folder.  To incorporate the burgundy, I cut out a top piece at 4x5 and rounded the edges on that as well.  i stamped the sentiment out of a Recollections Wedding stamp pack, and used a star corner stamp for the opposing corner.  I decided to add some more rhinestones to the front, as bling makes everything look a little better!!!!
I added the dress using 3d pop dots, to add some depth to the card. I finished it with sheer black ribbon tied with a small bow! Voila!!! Bridal Shower invites are finito!!!!!  Aren't they lovely?!?


Thanks for stopping in and have a LUCKY day :-)

Up for a Challenge!

So it's been hectic around here trying to finish up these wedding and bridal shower invites for my good friend Karen, but you know I always find time to create other projects!
I'll start by showing you a page I made for last week's Guest Designer (Jenessa Franco) over at Colorful Creations.  We were given this sketch to work with...

I decided to turn the sketch 1/4 turn counter-clockwise.  These are pics of my Father and Brother on Father's day this year.


I used papers from a DCWV paper pack I recently purchased that were perfect for these pics.  I had some chipboard letters lying around so I painted them white and added them to the title.  The colored letters are made by Thickers.  I added some twine, buttons, and under the sea embellies to finish off this Gone Fishin' page!!!! I found it hilarious that I took this picture (unbeknownst to my dad and brother) of them both doing the same thing in opposite directions!  Perfect "Father and Son" type photo!!!!

I also completed the September 15th sketch for Sketchers, and combined it with Milly's "Use your Stash" challenge at Colorful Creations.  This is the sketch we were provided (it's beautiful!)...


And here is my take on the sketch...


Isn't she darling?!? I decided to scrap photos of my youngest daughter's second birthday party last month.  She absolutely loves blowing bubbles, although she usually ends up with them in her mouth, and burping bubbles for the remainder of the day!!!!
For Milly's challenge, we were to use:
  • Solid Paper
  • Pattern Paper
  • At least three buttons
  • Tags
  • Title
  • A punched Border
  • Wet medium
I used Martha Stewart paper line for most of the papers, aside from the background piece by Coordinations Gem collection.  The banner at the top was already on the page, but I added some twine to give it some depth.  Of course, I inked all the edges (As I so often do) which covered my basis for a wet medium. I added a small gift tag on the present in the bottom right corner and buttons to the cupcake stand.  The rest of the title is from K&Company.  

My husband has decided that he wants a bookmark collection, for all those books he reads!!!! So, I have a new hobby to pursue!!!! I am a HUGE fan of anything Tim Holtz makes, including products and projects.  Since his vintage embellishments can take on a masculine look, I thought they'd be perfect for his bookmarks!!
Remember, I started a mid-month scraplift challenge over at Colorful Creations where you pick someone else's project idea, and copy it!  Stop in and check it out!
I came across this beautiful tag by a woman name Linda Cain.  Boy, is she AMAZING!!!!! OMG!!!! I could steal all of her ideas!!!! If you enjoy the "Tim Holtz" look of things, you should stop by her blog and see her wonderful work.  
Anyway, this is the tag that she created...

And here is my take on it...


The colors actually look a lot like the original in person, but photos always show a different hue.
I used Tim Holtz Distress inks in Wild Honey, Spiced Marmalade, Barn Door, Rusty Hinge, Forest Moss, and Black Soot.  I tried to get them as close to the original as possible.  I then spritzed a light spray of water once I inked it to make the colors blend a bit better. It also gives it a misted look, which is really neat.  The inks react with water, and are sooooo versatile. I also used various Tim Holtz stamps, including the famous "Umbrella Man" and his quote "Live the life you've imagined".  I wanted to show off the metal quote more, so I covered small spaces of the stamped one with vintage embellishments.  I also added a gear, which I attached with a metal brad, colored with Tim Holtz Alcohol inks.  I finished it by adding metal stickers to mimic the original.  Isn't it just wonderful?!?  I LOVE it!!!!!!!! And so does my husband :-)

And last on my list is a card I made for my friend's mother, who is going through some very difficult times.  I thought receiving a card in the mail might bring a smile to her face, if only for a brief minute.  We could all use a pick-me-up sometimes!
I started with a standard A2 card, and covered the front with various Cloud9 Design papers, following a sketch by page maps (and a challenge for Sketches4All).  I also used this as one of my cards for Paula's wet embossing challenge at Colorful Creations, embossing the stamped design on the bottom of the pink colored paper and the sentiment on the tag insert. I used a Martha Stewart border punch to make a small border with the same paper used as the background.  I wanted to make a pocket on the front, and this sketch was perfect for that challenge!  I made a small tag to insert, adding a sentiment and some ribbon.  I added some twine (it appears I'm addicted!), a button, and a sentiment to finish it off. I'm very pleased with how this came out!!!!


And here is the original sketch...


Well, as usual gang, thanks sooo much for stopping in!!!! Have a LUCKY day :-)


Wednesday, September 12, 2012

Quick Hello!

Hey there gang!!! Just a quick check in this evening... I will make sure to keep you updated with EVERYTHING I've been working on this week (rather, everything that's working on me this week!).  In the meantime, I wanted to let you know that Colorful Creations will be having a Fall Themed Crop from October 5th- October 7th.   There will be games and goodies so be sure to stop in and check it out!!!!

Friday, September 7, 2012

Moments

Happy Friday everyone!!!! I've been so busy lately, making wedding invites, Halloween decor (yes, already!), Bridal Shower invites, AND scrapbooking!!!!!! I was able to complete a few challenges and I thought I'd share them :-)

First, I'd like to show you a page I made for the new sketch site called Sketchers! Every week, a new sketch will be posted to get your creative juices flowing.  There will be a bi-monthly challenge, which puts you into a drawing for some fabulous prizes! 
This is next week's sketch...


And here is my take on the sketch.  


I chose to scrap some photos of my oldest daughter prancing around the house in her swimsuit.  She is sooo photogenic!  The papers are from Recollections, grungeboard by Tim Holtz and painted in Vintage white and inked with Victorian Velvet.  Embellies are from K&Company and Recollections.  I "dabbed" a little into the world of gesso on this one, but just enough to not mess up my paper in case I got too carried away!!! 

Another project I completed was for Rachael's Tag Challenge over at Colorful Creations.  This month, the challenge was to create a standard shipping tag (5x2.25) with the word "moments" clearly visible.  I decided to go "vintage with a masculine look" on this tag.  My husband has been wanting a new bookmark, so I took full advantage of killing two birds with one stone!!!! 

I started by using a Tim Holtz Gears embossing folder to emboss the bottom of the tag.  I distressed all the edges and began to ink away!  I used Tim Holtz distress inks in Wild Honey, Peeled Paint, Broken China, and Walnut Stain.  I also went over the gears with Ranger's Perfect Pearls, although I don't have a close-up to show you.  Just imagine the gears with a slight shimmer to them :-) I finished the tag by adding various Tim Holtz clear stamps and a metal gear.  The sentiment at the bottom was stamped on cardstock, then I used a background stamp to give it ome layers.  Then I simply distressed the edges, and inked it to keep the look going!!!! I am in love with the end result, as is my husband :-)
Hope you enjoy as well!!!!!


Well, enjoy your Friday gang and as usual... Thanks for stopping in and have a LUCKY day :-)

Friday, August 31, 2012

Playing with Love and Simple Stories

Happy Friday everyone (just barely, but still Friday nonetheless)!!!! This "back to school" time is really "kicking my butt"!!!! I have been sooo very tired lately but am still managing to get in some (well needed) scrap time :-)
Last month, I was lucky enough to win a few challenges through various scrapbooking sites and received some pretty GREAT scrapbooking items!! One of them was a kit by "Simple Stories" called Summer Fresh.  LOVE IT!!!! I was able to create some beautiful layouts for my September challenges over at Colorful Creations and Sketchers
The first page is for the Design Team Reveal over at Sketchers on Saturday.  Sheshe created this beautiful sketch for us to work with...

And here is my creation...


What did I tell you?!?!  Isn't this line just wonderful?!?! Everything on this page was included with the kit... Papers, die-cut stickers, "denim" numbers, quote stockers, EVERYTHING!!!!! I had sooo much fun working with both this kit AND this sketch!!! And I have to say that I am very pleased with the end result :-)

My next layout was created for both my September Project Challenge at Colorful Creations, but following a sketch from Sketch Inspiration.  I think I became addicted to working with sketches from the first time I finished one!!!! Any who, here is the sketch...


And another bright and "summery" page from the Summer Fresh line!


Again, everything you see here is from the same kit.  
For the month of September, I decided to work on pinwheels for my challenge.  I've been seeing them more and more on pages, cards, weddings, etc.  They have a very appealing look and are very versatile since YOU are choosing the paper that makes them!!!! I wanted to "go big" on this one to fit with the theme of the page, however most pages tend to have them much smaller.  This is a picture of my oldest daughter at a friend's birthday party earlier this year.  She swears she "loves" cupcakes, but really she just loves to lick all the frosting off of them and throw the cake away! 

And last, but certainly not least, I bring you card I made with love.  No, really.  I used a stamp from Tim Holtz that says "LOVE"!!!!! And it's AMAZING!!!! My husband was in desperate need of a "pick me up" so I decided to make him an inspirational card.  He truly is a wonderful man, and I wanted to remind him of just how important he is to me! (I know... blah, blah, blah...) This card is for my September Card Challenge, also held at Colorful Creations.  Stop in and check it out!!!
I started with a standard 5x7 card base with tan cardstock, then dressed it up a bit.   I had some tan vintage paper in my scrap pile that I used as the background here.  I also found some red Co'ordinations distress paper by Tim Holtz in my pile that I embossed and sanded, to give the card some texture.  When that was finished, I used my brayer to add a thin coat of medium over the raised areas, then added some Perfect Pearls to give the card an "ever so light" shimmer.
The "vintage white" paper is also from Co'ordinations, and is from their "Whitewash" line of core papers. I added some atop of the red paper, inking the edges with Tim Holtz Distress Ink in Tea Dye.  Then I embossed another piece with a Tim Holtz Sizzix "Frame" embossing folder, and used my hobby knife to cut around it.  The stamp is also from Tim Holtz (I swear I did not do this on purpose but Tim Holtz pretty much owns this card!!!) and comes inside the same frame you see embossed here.  I topped it off with some swirls and pearls and a few inspirational words on the inside!!!! What do you think?!?

And here is a side view so you can see the dimensions!!!


Well, as usual gang... Thanks for stopping in and have a LUCKY day :-)


Sunday, August 26, 2012

You and Me

Hello again!!! Thought I'd share with you a layout I finished for a site I only recently came by called C'est Magnifique!  They are "kit club", where you can purchase kits of scrapbooking supplies that all go together, to form beautiful projects.  Although I do not participate in the purchasing of kits (yet!), I decided to go ahead and enter their monthly sketch challenge.  
Here is the sketch...

And here is my creations!!!


I LOVE it!!!!!!!!!!!!!!!! This is a picture of me and my husband on our Honeymoon.  We were all dressed up for the "Captain's Dinner" aboard the Carnival Legend.  
I used various Recollections and DCWV papers for the page and rosettes.  I did not want to add another photo so I decided to make a "Title Box".  The paper in the box already had this beautiful butterfly on it so I just trimmed it down and framed the butterfly with rhinestones.  The title itself is from K&Company.  The glittered butterfly border down the middle is actually just cut from a piece of paper I had lying around.  I also traced some of the leafs at the top with one of my Glaze pens to give them some depth.  I am obsessed with making rosettes, and I thought this sketch called for them!!!! I think they just look soooo nice on this page!!! 

Thanks sooo much for stopping by and have a LUCKY day :-)


Word of the day... Busy!!!!!!!

Hey there my fellow followers!!! I am elated to bring you some WONDERFUL news!!!!!! I will now be a Design Team member for a wonderful new site called Sketchers!!!!  It's an awesome site that you can use to get your groove back... or even just to grab a little inspiration!  Each week, a new sketch will be posted and there will be challenge on the 1st and 15th of each month.  Please be sure to stop by and check it out!! And don't forget to tell a friend :-)

As for my creativity, I have been quite a busy bee this week.  my oldest daughter started Kindergarten and HOLY MOLY was it hectic!!! I also had my youngest daughter's second birthday yesterday (which was completely draining!) at a park with our families.  I spent the majority of the week getting everything together and making all the decor (pics to come), including Princess hats, tiara's, Prince's crowns, pinwheels, "glass" slippers, and much more!!! Yes, I was one very busy mommy this week.  But I still managed to squeeze in a few cards and layouts that I'd love to share with you.  

The first is the weekly Guest Designer Sketch challenge at Colorful Creations.  We were lucky to have Mette as our Guest and she has some beautiful work.  Please be sure to stop by her blog and show her some love!!!!
This is the sketch we had to work with....

And this is the layout I created.  


This is my younger sister in her Senior Pictures earlier this year.  I know, I know... She's BEAUTIFUL!!!!!
For the challenge, I started with paper from DCWV and Recollections, cutting them down to meet the sketch criteria.  I also sanded some Black Magic Coordinations cardstock to give the page some texture.    The beautiful heart die-cut is from a care package I received from Rachael, another wonderful Design Team member over at Colorful Creations.  I used transparency for the title, then added some bling, some lace, and epoxy words to finish it off.  I just love it!!!

I also made some cards this week for some very special people.  
The first card I made was for Alyssa's new teacher.  Just an inspirational "Back to School" card to get her mojo back!!! It was very simple... Just pieced together some scraps, added twine and an apple die-cut, then stamped various inspirational words along with a flower and butterfly.  I hope it brought a smile to her face :-)

Another card I made was for a very special woman in my life.  My daughter's grandmother on her father's side (whom she calls "Nanny") has been a huge part of my life.  She helped me through some very trying times and I just wanted to show my appreciation.  We are still VERY close and I could never repay her for all she has done for me.  
I used some new cardstock papers from a Recollections pack at Michaels that are very bright and cheery!!! I embossed one of them with my new Swiss Dots Cuttlebug folder (that I am completely in love with!) and added them to the front piece to act as a "frame".  I stamped the sentiment atop of some very beautiful flowers.  I learned this technique on youtube and I think it's just so pretty.  I merely stamped the same image on various sheets of paper, then punched out the top of the flower with my 1' circle punch.  Using metallic brads, I added the pieces to the page and voila!!! Aren't these flowers so neat?!?!?

Well, as usual gang... Thanks for stopping in and have a LUCKY day :-)


Sunday, August 19, 2012

Cards and Such

Okay everyone... I have now ventured into the world of card-makers!!!! isn't that exciting?!?!? Every month, I will be hosting a mid-month card challenge over at Colorful Creations.  Please stop in and check it out :-)

For my first challenge, I decided to do something a little different. After watching several videos on how-to's and reading over various tutorials, I ended at using household cleaners to stamp with.  What was that??? Bleach? Dish Detergent? Are you serious? Well, I gave it a "test drive" and was amazed by the results!!!!
I started by inking plain white cardstock with Tim Holtz Distress inks in Wild Honey, Worn Lipstick, Fired brick, and Spiced Marmalade.  Then I set my stamp atop of a plate lined with Cascade (dish detergent) that acted as my actual stamp pad.  Then I laid the stamp on the inked cardstock and waited!!!!  I happen to be a very anxious person so I wanted to speed up the process a bit by taking my heat gun to the paper.  The heat actually makes these tiny bubbles come up from the detergent to give you one unique look!!!

Another technique I came across while browsing is called the reflection technique.  I wanted to give this a try for the "Say it with words" challenge hosted by Anne at Colorful Creations and combine it with the Holiday Challenge over at Sketches4All.  The "word" to use this month on the challenge was "Happiness".  The holiday challenge is called "The end of summer" challenge.  For the challenge, you are to create a project that means the end of summer to you.  Whether it's back to school, no more beaches, etc.  I think of fall when I think of summer ending and wanted to incorporate that with my card.
I started by stamping a tree stamp (any "nature" type stamp should work fine) on plain white cardstock.  Then, with the same stamp, I stamped a piece of transparency.  I took the transparency and laid it upside down (ink side down) on the cardstock and pressed firmly.  You are merely transferring the image from the transparency to the cardstock, but backwards.  I used Tim Holtz inks in Shabby Shutters and Tumbled glass to create a "land and water" type of effect.  This gives you the impression that there is a reflection of the tree in water.  Very neat!!!! I used my pop-dots to place atop of tan cardstock with a sentiment that says "Happiness comes through doors you didn't even know you left open".  I also ran some yellowish-gold colored cardstock through the Sizzix with the Swiss Dots embossing folder from Cuttlebug and laid it behind the image.  I am IN LOVE with this card!!! It just looks so beautiful :-)


Thanks again for stopping in!!! Have a LUCKY day :-)