June 2014

June 2014

Monday, May 26, 2014

Celebrate Life with Let's Get Sketchy and SATW!!!!

If you are here for the SNS Birthday Bash and the $20.00 Frosted Designs Gift Certificate, please click here!!!

Hey there gang!!!  Hope you are enjoying your holiday weekend!! Let us remember why we celebrate this day, and to the men and women who have made that possible :-)

Well, it is Monday, which means another fabulous sketch over at Let's Get Sketchy!  Here is this week's sketch:


I also combined this sketch with the May Mood Board over at Scrap Around The World!  They have an amazing challenge lined up with tons of fabulous prizes!!!  I was inspired by the beautiful colors, patterns, and balloons!!!


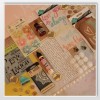
I know you are all so sick of seeing this collection, but I promise, it's almost all used up!!!  Hahaha!!!  
Here's my page:


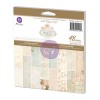
I've used the Simple Stories "Homespun" Collection from the Frosted Designs Store, yet again!  I just love the bright, bold colors!!  It's right up my crafting alley :-)

I wanted to keep this page pretty clean, so I used white Bazzil cardstock as my base, matted on Kraft Core cardstock by Tim Holtz (LOVE these papers!!!!).  I added some simple stencil work with the Heidi Swapp "Chevron Stencil" masked with a circle stencil on top.  I used black distress ink for color!


Teh, I cut out these adorable photos of my youngest daughter taken when she was only six months old!!  Oh, how I miss those days :-)


I used my Cricut Explore to create a stencil for balloons, then mixed molding paste with Lindy's Stamp Gang Magicals and alcohol inks for my desired colors!  After that was dry, I applied some Faber Castell Glaze mixed with fine, gold glitter for shine!


And I used red and white twine as my "strings!


I finished my page with some additional twine, and DIY Thickers with red and gold glitter for my title!


DON'T FORGET!!!!  You have until June 15th to link up your challenge for my SNS Birthday Bash Challenge for your chance to win a $20.00 Gift Certificate to the Frosted Designs Store!!!


Well gang...  Thanks soooo much for stopping in and have a LUCKY day :-)

 photo 84c064ac-ab01-4e94-bb12-3b3893d8f8eb_zpsabe08004.png

Saturday, May 24, 2014

Prima Princess Spring Bouquet with Cricut Explore!!!

Hey there crafty neighbors!!! I'm popping by the blog today to share a fabulous Spring Bouquet I recently made using the beautiful Prima Princess Collection in the Frosted Designs store!!!
 
Here's a look at this project:
 
I knew when I saw this collection exactly what I wanted to do with it!!!  I used my Cricut Explore and Giant Flowers cartridge to make all t e necessary cuts!  There are several other ways to make handmade flowers though!  You can use heart punches or dies, flower punches or dies, or even cut out the petals by hand and attach them to create large, beautiful flowers!


I started by cutting out all the petals in random papers from the 6x6 paper pad, then inked the edges with the "Knotted Wood" ink included in this month's kit!  I rolled the edges over various size paint brushes for a more "natural" look:


Here's a look at all three complete finished:

After I finished the top parts, I hot glued some long lollipop sticks to the base in bundles of three for dimension.  Then I grabbed coordinating ribbon colors and wrapped the base of each:
 
I finished all of them with a small bow!

After my flowers were complete, I started on my "vase" (altered mason jar!).

I used the wood icons included in last month's "Beauty of Nature" kit as well as a large Prima flower from the store!  I colored my flower with Lindy's Starburst Pearls mist and inked it with the "Knotted Wood" ink.  I wrapped some tinted rose ribbon around the jar and a small strand of pearls.


Once everything was all said and done, I added the flowers inside the jar and finished it off with a little hemp cord!!!


Well gang...  Thanks so much for stopping in and have a LUCKY day :-)

Products from the Frosted Designs Store:

SNS Birthday Bash Challenge with a Fabulous Prize!!!!!

Well hello there fellow crafters!!!!  I hope you have been enjoying the month long Birthday Bash over at Sketch N Scrap!  I stopped by the blogs the other day and let me tell you...  There are some AMAZING projects from some VERY talented designers!!!  If you haven't had a chance to check out the challenges yet (and all the yummy prizes!!), there's still time!!!!  All the challenges are listed on the right hand side of the SNS Blog!

Any who...  I'm here today to share my very own challenge with you!  Since we are celebrating a birthday, I decided to make my challenge all about balloons or pinwheels!!!  Yep...  It's really that easy!! Just add balloons or pinwheels to ANY TYPE OF PROJECT and link it up below! 


One LUCKY participant will win a $20.00 Gift Certificate to the Frosted Designs Store!!!!  WOO HOO!!!!!!!  


I will also provide a small RAK to one person (selected at random) from the comments on this post!!!! (scroll to bottom of post for details!!!!!)

 
Now...  Here's a couple of Projects I created to get you inspired:

Simple Birthday Card with Crate Paper
First, is a simple card I made using hand-cut balloons and a simple sentiment!  Here's a look:


I used an old Crate paper line I had lying around.  It's one of my go-to paper pads for birthdays!!!! 
I started by layering up some papers and adding white Bazzil cardstock for a non-busy background.  I cut the chevron pattern from a paper in the pad and attached them to the front of the card! 


I fussy cut one of the elements from the collection and stamped a simple sentiment in green ink!  I also wrapped some grey twine around the card!


And of course... Balloons!!!!  I hand cut some balloons out of the pattern papers and used pop-dots to adhere them to the card base!  I added more of the grey twine to serve as the strings!  


I finished the card with a small rhinestone and tiny wood stars!


Exploding Box Birthday Card with Crate Paper
Next up is an exploding box card!!!  I've been seeing these all over the place and finally gave it a shot!  It was actually quite simple and I may post a tutorial on my blog soon!  
Here's a look:


Isn't it just adorable?!?  And it would make the perfect little box for any birthday boy or girl!!!
I started with Neenah Kraft cardstock as my base and made all my score lines.  Then, I cut out my pattern papers in the desired sizes and inked the edges with Walnut Stain Distress Ink.  I attached all the pattern papers and folded up my box!  I added in my inserts and attached tiny strips of acetate (three pieces layered atop each other then cut down to size) to the inside of them.  


I hand cut my balloons and used my Cricut Explore to cut the letters from coordinating paper, then attached all the pieces to the acetate strips with a small amount of super glue!


I fussy cut one of the elements from the paper pad with the Happy Birthday Sentiment already on it and adhered it using pop-dots!


I had to make sure my box worked the way it was supposed to so I folded it up by simple pushing down on the center.  This is how it will look when taken from the envelope!


You could also attach the sides down if you prefer to store it on a shelf, or leave it as is!


I'm certainly glad I gave this a shot and I will certainly be making more of these in my very near future!!!


Now I bet you want to know how to get your hands on that fabulous prize?!?!?  IT'S EASY!!!!  
1.  You must be a follower of my blog AND the Sketch N Scrap blog to be entered to win!
 
2.   Complete a project (ANY TYPE OF PROJECT!!!!!) with balloons or pinwheels!!!!  You can add embellishments, hand cut some out, use pattern paper with balloons or pinwheels on it, or use ribbon with balloons or pinwheels printed right on it...  GET CREATIVE!!  
 
3.  Link up your project below by 11:59 p.m. on JUNE 15TH!!!!!!  Your project must be newly created as of May 24th and cannot be combined with any other challenges for Sketch N Scrap!  In order to be eligible for the prize, you MUST link back to my blog or the SNS blog!!!  No exceptions!!!

I will have a random draw of all the participants via Random.org and post the winner of the Frosted Designs Gift Certificate on my blog on June 16th!  I will also choose someone at random from the comments on this post to receive a small RAK!!!  You MUST be a follower of my blog and the SNS blog to be entered!!!!
 
4.  HAVE FUN!!!!  After all, that's what this is all about :-)

 
Well gang...  Thanks so much for stopping in and have a LUCKY day :-)
 photo 84c064ac-ab01-4e94-bb12-3b3893d8f8eb_zpsabe08004.png
 

Friday, May 23, 2014

New Friday Challenge posted at Frosted Designs!!!

Hello again my crafty friends!!!  I'm back today to share a card I made for the new Friday Challenge over at Frosted Designs!!!  

Your challenge is to use STARS and STRIPES on your project!!!  Any type of project is acceptable!!!  Cards, layouts, ATC's, mixed media, etc.  GET CREATIVE!!!!

I know you're probably all sick of seeing the Simple Stories "Homespun" collection from the Frosted Designs Store...  But I just can't leave it alone!!!!  Hahahaha!!!!!  So yes...  I have yet another project with this set :-)
Here's a card I made for the challenge:


LOVE how this card came out!!!!  And I love the bright, bold colors in this line!!  Amazing!!
I started my card with the "Rays" layering stencil by Tim Holtz and some molding paste.  I mixed the paste with Butterscotch Alcohol Ink until I achieved my desired color.  Then I applied it over the stencil on white Coordinations cardstock.


After that was dry, I layered on other papers that were first inked with Walnut Stain Distress Ink.  I grabbed one of the quote cards with the set and matted it on Neenah Kraft and inked the edges.  I used my Crop A Dile to punch holes in the chipboard heart and tie some paper string through it!


Now, all I needed to do was add some stars!!  I'm addicted to these wood veneers...  I have so many different types and styles and they are my go-to embellishment when I want to add just a little something to my project!  These are by Studio Calico and come in various sizes!  I sprinkled a couple on my card and glued them on!


There you have it!!  Stars and stripes and molding paste, oh my!!!  


Well gang...  Thanks so much for stopping in and have a LUCKY day :-)


 photo 84c064ac-ab01-4e94-bb12-3b3893d8f8eb_zpsabe08004.png

Thursday, May 22, 2014

School Project with the Cricut Explore!!!

Hello everyone!!  It's another busy week here in the Matos home!!  My daughter had a school project to do and I think I was more excited than she was!!!  Hahaha!!!

Her task was to make a castle, out of anything she chooses (except food!).  This was the perfect task for my new Cricut Explore!!!  I just simply haven't had the time to use it yet so I was anxious to get to work!!!
Here's a look at the finished castle:


Isn't it just too stinkin cute!??  I wish my mom would have had something like this when I was in school!  I would've aced every project :-)
I used the Once Upon A Princess Cartridge to create the castle, towers, and smaller castles.  I would typically give you the size I cut it at but I just don't know!!!  The Cricut Design Space software is completely different than the Craft Room.  All the pieces are grouped together so there's no way to actually cut the desired piece at a specific size (hoping this gets adjusted later down the road!).  
I used my Sizzix Grand Calibur to emboss the fronts of the smaller castles, then adhered them to the bigger one using my glue gun!


I cut one of the princesses from the Once Upon A Princess Cartridge but wanted something else!  So, I searched for "knight" in Design Space and come across this cute little guy! 


The project required the use of different materials so I had my daughter paint some small popsicle sticks to match the colors of the castle.  I cut a piece off a foam cup for the roundness and attached the popsicle sticks on top!


And what do you need to add to every princess castle?!?  Why, a moat of course!!!  My daughter chose this blue glitter paper to serve as water for her moat.  I cut it using "funky cut scissors" (is that what they're called?!?) and matted it on a neutral cardstock to mimic sand.  I also used a shimmer green cardstock as the base that I adhered to the top of a piece of foam board.


I'm so thankful for my Explore...  It truly made this project a breeze!!!


Well gang... Thanks so much for stopping in and have a LUCKY day :-)


 photo 84c064ac-ab01-4e94-bb12-3b3893d8f8eb_zpsabe08004.png