June 2014

June 2014

Monday, July 28, 2014

New Sketch Challenge at Let's Get Sketchy with 7 Dots Studio Illumination!!!

Well hello there everyone!!!  Hope you're having a fabulous start to your week so far :-)

"Freedom to be Beautiful" with 7 Dots Studio "Illumination"
It's time for another wonderful sketch over at Let's Get Sketchy!
Here's a look:


I have always been a HUGE fan of Tabitha's sketches!!!  I don't know why but they really get my creativity flowing!!!
Any who, here's a look at my page:


Isn't my daughter so lovely?!?  And soooo photogenic!
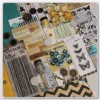
I purchased this 7 Dots Studio "Illumination" Collection months ago from the Frosted Designs Store and have had very little time to actually play with it!  I was excited to break it out and put it to use!
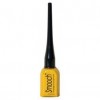
I started by choosing my papers, then putting them down with adhesive and outlining them with gesso (I actually "stole" this technique from Hera Sugitani, the Guest Designer over at Scrap Around the World this month!  You can check out her page here).  After seeing her tutorial, I knew I had to give this a try!  Being relatively "new" to this hobby, I like to try new (and old but new to me) things ALL the time!!!!!!!  I also used some white mist by Dylusions to create splatter on my background, then added liquid pearls in several colors for accents!


I grabbed some Tim Holtz rub-ons from the "Enchanted" kit at Frosted Designs and added them all around my page!  I probably could have used an entire sheet... I just got carried away!!!!!  For my title, I used some sticker letters and chipboard from Creative Embellishments that was treated with a coat of gesso and a blue gelato.


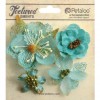
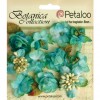
I finished the page with some flowers by Prima and Petaloo, along with gesso-coated die-cuts!


Well gang...  Thanks so much for stopping in and have a LUCKY day :-)

 photo 84c064ac-ab01-4e94-bb12-3b3893d8f8eb_zpsabe08004.png

Sunday, July 20, 2014

Tim Holtz Double Time at Sketch N Scrap!!!

Hello everyone!!  I hope you're having a fabulous July so far!!!!  

Just popping in to share some cards I made for the new card sketch over at Sketch N Scrap!
Here's a look at the fabulous new sketch:


I LOVED this sketch sooo much that I used it to make TWO cards!!!!  That's right...  And of course I had to use products from one of my all time favorite people ;-)


Aren't they so wonderful?!?  Seriously?!?  LOVE them :-)
I started with Neenah Kraft as my base, then added my layers of inked up paper, using pop-dots for dimension along the way!


I created the windows using my Cricut Explore machine, then added liquid pearls for added dimension!


I then finished each card with a different sentiment, all by the wonderful man known as Tim Holtz!


There you have it crafters!!!  Two simple cards with one fantastic sketch!!!  


Well gang...  Thanks so much for popping in and have a LUCKY day :-)

 photo 84c064ac-ab01-4e94-bb12-3b3893d8f8eb_zpsabe08004.png

Saturday, July 19, 2014

Handmade "Frozen" themed Invitations!

Hey there crafty neighbors!!!  I'm just popping in to share some adorable invitations I made for my daughter's birthday next month! 

For the past few months she has insisted that she wants a "Bubble Guppies" party.  So, being the "crafty" mom I am, I spent hours creating cut files for Bubble Guppies invitations and party decor.  Then, like almost all four soon-to-be four year olds do, she changed her mind!  TRUE STORY!!!  Now, what kind of party does a four year old want these days?!  A Frozen party, of course!  So again, I spent hours creating cut files for a Frozen themed party using my new Cricut Explore and Design Space.  I absolutely could not be happier with the results!!!  

Here's a look:


Aren't they just adorable?!?  I am in love with these cute little pop-up cards!  
 The detail on these snowflakes in AMAZING!!!!  I really don't know if there's another machine out there that can cut this intricately!  I mean, these flakes are probably smaller than a quarter!

The best part?  These fold up nicely to fit right into an envelope for mailing!  How cool is that?!?  


Well gang...  Thanks so much for stopping in and have a LUCKY day :-)

 photo 84c064ac-ab01-4e94-bb12-3b3893d8f8eb_zpsabe08004.png

Friday, July 18, 2014

New Friday Challenge at Frosted Designs with Prima's Time Traveler Collection!!!!

Whew!!!  It has been one busy month for me!!!  I feel like I've been writing a post every other day or so!!!!

Any who, I'm here today with a fabulous new Friday Challenge posted at Frosted Designs!   Your challenge is to use stitching AND flowers on your project!!
Here's what I created:


This is a card I made for my husband using the June "Capture the Moment" kit at Frosted Designs!  
I started with a Kraft base, then layered up several papers and embellies from the kit!


I used several techniques to alter the wood ATC pieces included in the kit, including using mists, markers, white gelly roll pen, Prima Stamps, and letter stickers from past kits!  


I added some pop dots for dimension!


I cut up a brick panel piece from Creative Embellishments  , then added some inks and mists!


I finished the card with the beautiful Prima script ribbon from the kit, and used my gelly roll pen to create some faux stitching around the border!

Well gang...  Thanks so much for stopping in and have a LUCKY day :-)

 photo 84c064ac-ab01-4e94-bb12-3b3893d8f8eb_zpsabe08004.png

Monday, July 14, 2014

Reveal for Week 2 Sketch Challenge at Let's Get Sketchy!!!

Hello there crafters!!!  I hope you are having fabulous weather in this hot July we are having!!!

I'm here today with an amazing new sketch challenge over at Let's Get Sketchy!
Here's a look at this weeks' sketch:


And here is my page:


This is my first attempt as using a large die-cut in my background so I had quite a time! 
I used a cut file from A Cutt Above the Rest for my background die-cut, then inked it with a number of different distress inks and misted it with black Dylusions mist!  After it was dry I matted it with smooth white cardstock.  


I added my photo (this is my oldest daughter on a cruise we took last year! This giant octopus sculpture is on the ship!  I made a flower cluster to the corner of my pic with machine cut die-cuts and hemp cord!


I knew I wanted to use the "Summertime" title from Creative Embellishments for this page.  I applied a thin coat of gesso atop of it,  a small amount of molding paste for texture, then added Spiced Marmalade Distress Stain.  Once dried, I applied Smooch Accent ink in Sundance for some shimmer!


Here's another close-up of the texture and mixture of mediums :-)


Well gang..  Thanks so much for stopping in and have a LUCKY day :-)

 photo 84c064ac-ab01-4e94-bb12-3b3893d8f8eb_zpsabe08004.png

Thursday, July 10, 2014

Somewhere In Time Layout + Snapguide Tutorial with Frosted Designs "Enchanted" Kit!!!

Hello again my crafty friends!!!  Just popping in to share a wonderful layout created using this month's "Enchanted" kit from the Frosted Designs Store and a quick tutorial on using the Distress Crackle Paint included in the kit!!!

First, let's altered some chippies!  I am a HUGE fan of the Creative Embellishments chipboard... It's durable, easy to alter, and extremely beautiful!!!  So I grabbed a couple pieces from my stash and went to work!  This is my first tutorial in Snap Guide so bear with me!

Check out How to Add Texture to Your Chipboard With Crackle Paint! by Brandi Matos on Snapguide.

I also used the following picture as inspiration from the July challenge over at Creative Embellishments:


And here is my layout!
I took several pictures of my daughter on Halloween of last year.  She was so anxious to be a "purple tooth fairy"!  I made her wand and costume, then took tons of pics and printed them in color and black and white!  This was my first attempt at an accordion fold on my paper so please be nice...  This paper gave me an excellent opportunity to do this!!!


Isn't my "baby" so beautiful?!?  I don't mean to brag but I just can't help myself sometimes :-)

I was totally inspired by the beautiful blue hues in the inspiration photo, the color of the pineapple (these papers and flowers were perfect for that color!!), the beauty of nature behind the main focal point, and those big, luscious flowers in the drinks!!!  

I started by creating the fold on my paper, then heavily distressed the sides with the teal Prima inker and my distress tool.  I also used a chevron cut file from A Cutt Above The Rest to create a stencil, then sprayed black Dylusions ink from the store over it right down the center of my page!  I grabbed some of the Tim Holtz rub-ons from the kit and added them around my page :-)


I fussy cut several elements from the papers in the kit and added them around my page!  I also added several embellies, including the resin clock, Maya road trinket, and the beautiful Petaloo flowers!  I added additional Prima flowers from my stash and even tucked one inside the large bottle cap from the kit!


I finished my page with the yummy chipboard pieces from Creative Embellishments that I altered in the above tutorial!  They were painted, heat embossed, then inked!


Although this is my first try at the fan fold on one of my pages, I assure you, it will not be the last!


Well gang...  Thanks so much for stopping in and have a LUCKY day :-)

Products used from the Frosted Designs Store: