June 2014

June 2014

Tuesday, December 31, 2013

Exciting Design Team Changes and Sketches4All Mixed Media Challenge!!!

Happy New Year all!!!!  I hope you have a fabulous (and SAFE) New Year's!!!  I truly can't believe that 2014 is already here!!!!

With the start of the New Year, there is also some exciting news!!!  

First, I would like to announce that I will now be on the 2014 Design Team for....  FROSTED DESIGNS!!!!!! I can't tell you how happy this makes me!!! I have been "playing along" with them for quite some time and am always inspired by their very talented DT.  And now, I'm a part of it!!!!  When you have a moment, please stop in and check out their blog: http://www.frosteddesigns.blogspot.com/ and Store: http://frosted-designs.com/.  Frosted Designs is a "Kit Club" but their store is loaded with wonderful collections, embellishments, mixed media supplies, etc.  I will be sharing my first project with them on January 7th :-)

Secondly, as most of you know, I have been on the Design Team with Colorful Creations for a little over 18 months now.  The site is undergoing some changes and effective January 1st, it will be a Challenge Blog!!!  The "ning" site will no longer be there, but the creativity and inspiration will continue to flow on the blog!!!  Stop in and check it out: http://colorfulcreations2014.blogspot.com/.
 

"Altered Trinket Box" with Crate Paper "Maggie Holmes" Paper Pad
Okay... Now that I have the "big" news out of the way, I'd like to share a few projects I've been working on for the New Year!!!  Sketches4All is hosting a "Mixed Media" challenge for the month of January... That's right... GET MESSY!!!!!  Any type of mixed media work is fine!  
I decided on making a trinket box for the challenge.  I found this unfinished wood box at Michael's on clearance because the clasp was broke.  No biggie!!!  I knew I was going to replace it anyway!!!  
Here's a look at the box before I started working (I already painted it when I took this photo! Please excuse the first few pics as it was already dark outside!)


I started by measuring the box and cutting out paper pieces accordingly (American Crafts 'Maggie Holmes' paper collection).  I inked all the edges with Distress Ink, then got to work!!!!


I layered on some Mod Podge (matte used here!) and started adding my pieces.


After all the paper was on, I added another layer of Mod Podge for sealing purposes.  Then I started to embellish!  
I just love the rose trim by Tim Holtz!  It's so pretty and very versatile.  I colored it with "Chipped Sapphire" Distress Stain (which left my hands blue for days!!!) and added it to the base of the box.  I added another pink trim with pearls directly above that.  I used my Martha Stewart "doily" edge punch and created a border to go down the center of the box.  I then added a pink ribbon atop of the punched piece and strategically placed tiny pink rhinestones around the entire box.  I then added some flowers by Martha Stewart and Recollections, metal pieces painted with "Silver" Liquid Leaf, and blue felt and inked paper to the inside for a finished look!!!

Here is the finished product!!!!


Isn't it beautiful?!?  And to think... This box only cost me $1.75!!!!  AWESOME :-)

 
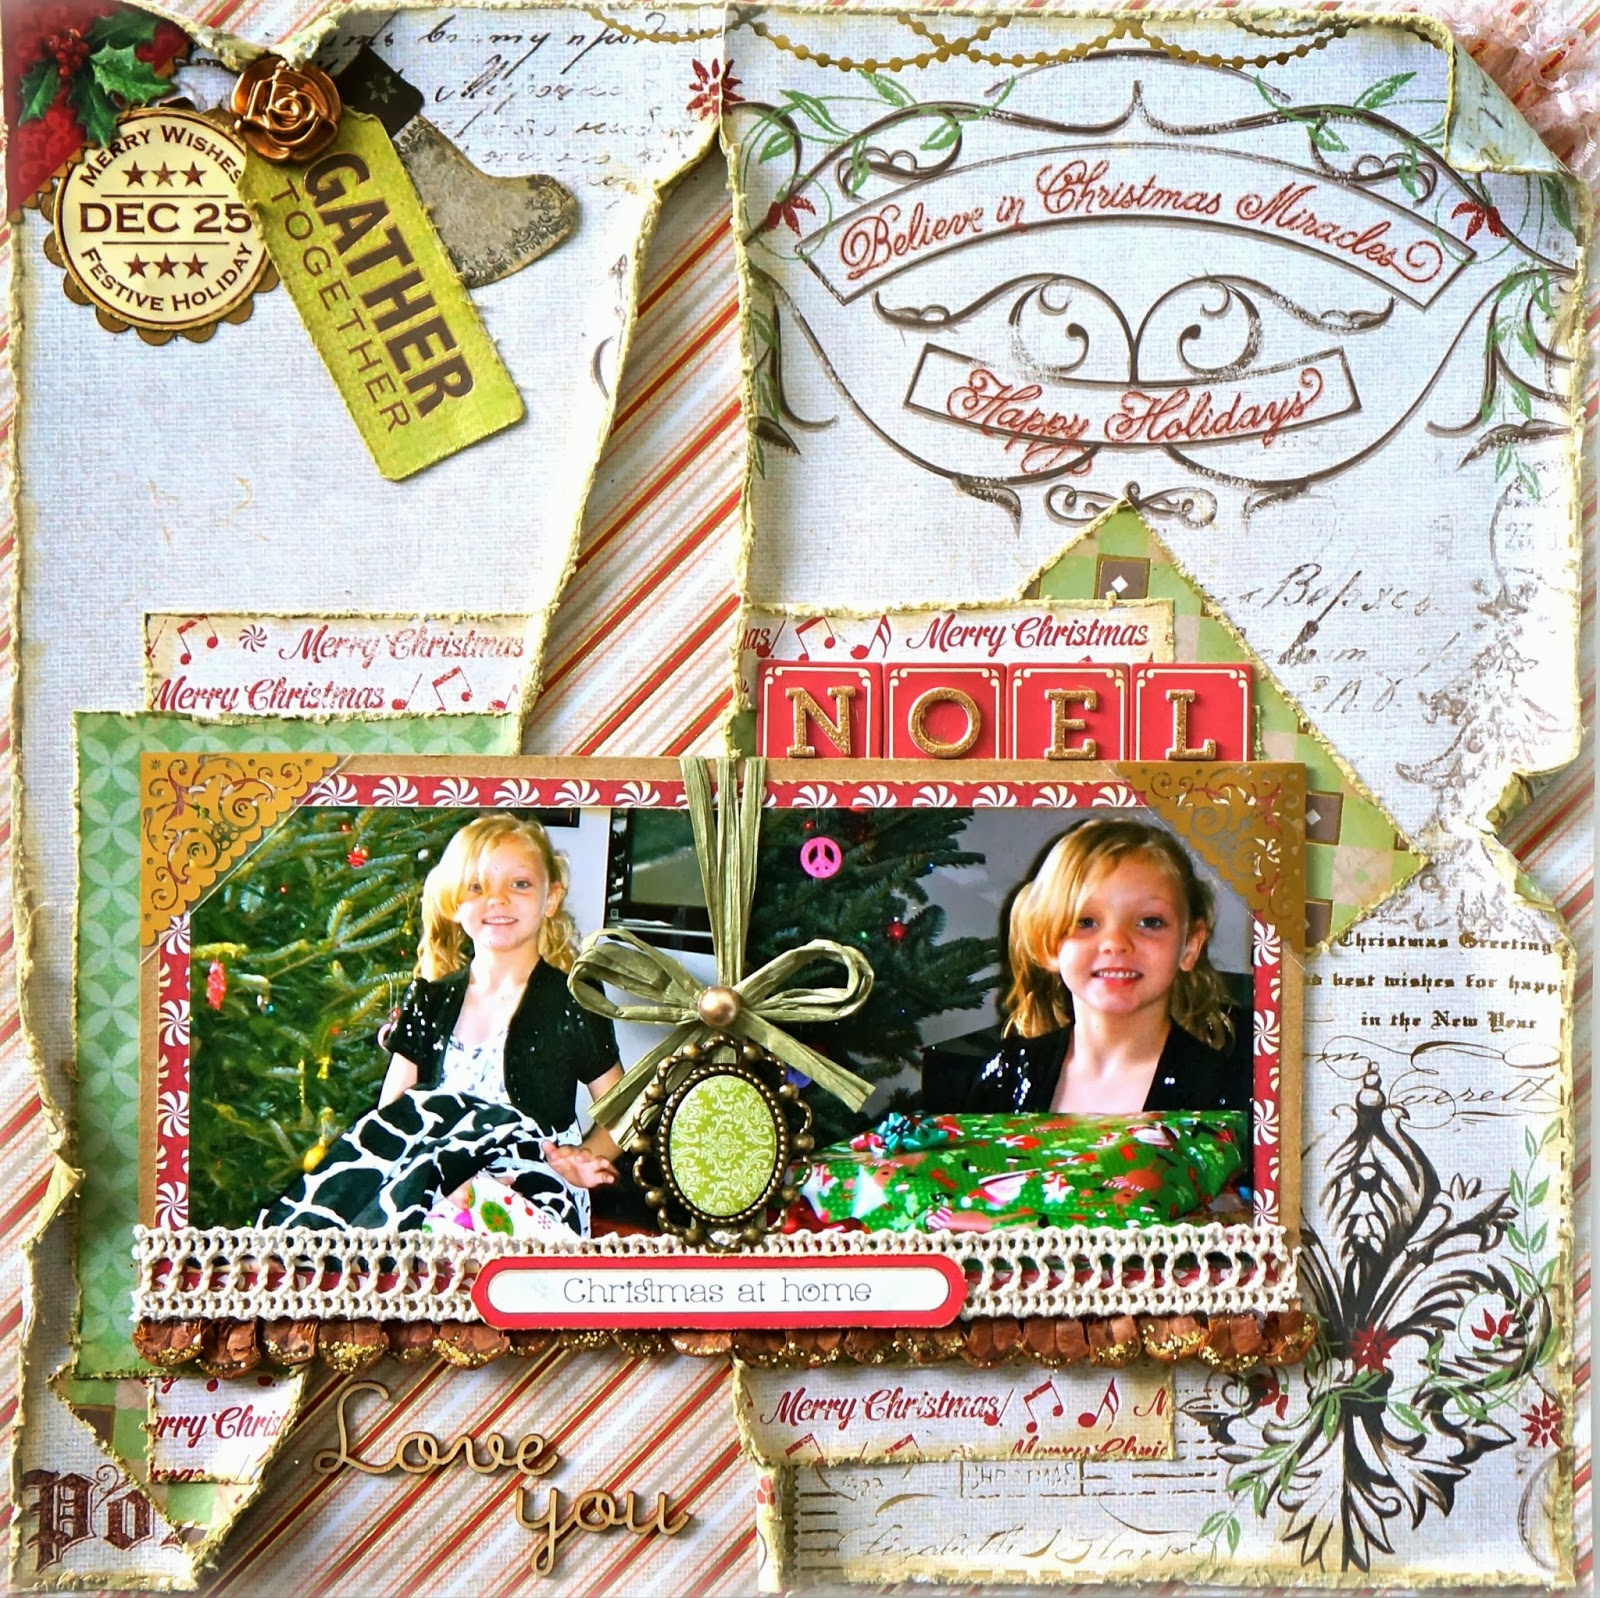
"Christmas Cheer" Scrapbook Layout with Simple Stories "Handmade Holiday" Collection
Next on the list is a page I created for my January Sketches4All "Once Upon A Theme" Challenge!!!  
I decided for January, I would do a "Cheer" theme!!!  Holidays always seem to bring people cheer and what better way to show it than with a scrapbook page?!?  
I used Sketch # 105 from Sketchabilities to complete this page:


This is my oldest daughter on Christmas of last year:


I used the Simple Stories "Handmade Holiday" paper collection to make this layout.  It's full of awesome elements and tidbits for "fussy cutting"!!!  The tree has buttons designed onto the paper so I added real ones for detail where they lay.  
I made the "pocket" with coordinating paper and used a White Gelato by Faber Castell and a snowflake stencil to create the
design.  I finished the page with tiny chipboard stars by Studio Calico (purchased from the Frosted Designs Store!!!).  
Here are a couple of close-ups:


Well gang...  Thanks soooo much for stopping in and have a LUCKY day :-)

See you next year!!!!


Thursday, December 26, 2013

DCWV "Christmas Made" Favor Boxes and other Exciting News!!!!

Hello my crafty friends!!!  I hope you all had a beautiful holiday and are set to have a fabulous (and safe) New Year!!!

Altered Christmas Favor Boxes using DCWV "Christmas Made" Paper Pad
I'm here today to share some easy-to-make favor boxes I made using the DCWV "Christmas Made" paper stack.  I absolutely LOVE this paper pad and all the cute elements that come along with it!!!  I made one of these with the Frosted Designs "Friday Challenge" in mind... The challenge is to incorporate three or more of the following on your project:

- Roses
- Mittens
- Brown Paper 
- Strings
- Cream Colored
- Apple
- Bells
- Wings
- Blue Satin
- Snowflake
- Silver White
- Favorite

Here's a look at the one I made for this challenge: (I used cream-colored gingerbread paper on the base, Angel wings on the die-cut, and metal snowflakes)


I started with pre-cut, standard size favor boxes and adhered the desired pattern paper to the top and bottom portions.  I used a Martha Stewart paper punch to create the piece around the center of this box, then added Petaloo trim atop of it.  I finished by adding various die-cuts by K&Company and a number of embellishments (white and gold flower by Recollections, 3D Christmas tree by Martha Stewart, and metal snowflakes by Momenta)
  
Here's a look at this box from the side:


And here are all of the boxes I created using the same paper pad and K&Company die-cuts:


I added handmade candy jars in the boxes and gave them to my niece and nephews.  These were SUPER easy to make and I will certainly be making them again in the future!!!


"Christmas Greetings" Handmade Christmas Card using MME Lost and Found Christmas
I also wanted to share with you the latest card sketch over at Sketch N Scrap!!!  I totally forgot about this one with the very hectic holidays but better late than never!!! Hahahaha!!!!


And here is my card:


This card was made using the MME "Lost and Found Christmas" 6x6 paper pad.  I cut all the papers to the desired size and inked the edges with Distress Ink.  I fussy-cut the sentiment piece from the same paper pad and stamped the "Christmas Greetings" from Fiskars.  I added two small bells to the chipboard snowflake by "The girls Paperie" along with some sparkling twine!!!  I finished the card with some string, a wood button, and some pearls colored with a Spectrum Noir marker.  


I also have some VERY EXCITING NEWS to share:
The "Christmas" edition of Let's Get Sketchy's Sketch Inspired Magazine is officially out... And I have FOUR PROJECTS that were PUBLISHED in this edition!!!  YAY!!!!!!!!!!!!


Here are the pictures of the pages with the original photos beside them:


Don't forget... I have some additional exciting news to share with you at the start of the brand New Year... Stay tuned for details!!!!

Well gang... Thanks sooo much for stopping in and have a LUCKY day :-)


Monday, December 16, 2013

Frosted Designs Silver and Gold with Pink Paislee Noel!!!!

Happy Monday my crafty friends!!!  I just thought I'd pop in to share a layout I made recently for the Frosted Designs Fabulous Friday Challenge!!!

The challenge this time around is to use BOTH Silver and Gold on your project.  I have to admit... This was a challenge for me as I usually don't combine the two colors so I had to find my "happy medium" :-)

"Play At Christmas" with Pink Paislee "Noel" Paper Pad
I started by using the following sketch by Brenshevia (it was originally for the  LGS "Cover Girl submission but I ran out of time!!!).  Here's a look:


And here is my completed layout:


I LOVE the Pink Paislee "Noel" paper pad!!!  It's just so pretty!!!!
I wanted to make a background die-cut so I used my Cricut Expression 2 and the Ornamental Iron 2 Cartridge.  I also used various punches for detail around the page.  I distressed all the edges then inked them using "Tea Dye" Distress Ink.  I followed the sketch very well.... SHOCKING!!!! Hahahaha!!!!
The quote was cut from a DCWV Vellum Quote Stack and matted with coordinating paper.  I added a Martha Stewart adhesive border and various other embellies.  The glittered ornaments were fussy cut from pattern paper and hung below the Recollections Trim!  I dry embossed some chipboard through my Sizzix Grand Calibur and coated it with Silver Liquid Leaf.  I also used mod-podge and coordinating paper to make the chipboard snowflake... finishing it by adding a Silver outline with a Sharpie marker.
For my Gold, I took Heidi Swapp Chipboard Stars and added a layer of "Gold Brilliance Ink" to the top, wiping them off afterwards so that the underlying pattern would show through :-)

Here are some close-ups:

This is chipboard that was dry embossed with the "Polka Dots" folder and then coated with Silver "Liquid Leaf".  I also made the snowflake by mod-podging coordinating paper over a chipboard snowflake, the outlining it with a Silver Sharpie Marker!!!

The Heidi Swapp chipboard stars were coated with a layer of "Gold Brilliance Ink" then wiped dry so the underlying pattern would show through :-)  Perfect combination of Gold and Silver :-)

Well gang...  Thanks soooo much for stopping in and have a LUCKY day :-)


Monday, December 9, 2013

All is Calm... Handmade Christmas Card with MME Merry and Bright!!!!

Hello again friends!!!  Just another quick stop in to share yet another fabulous Christmas Card!!!

Handmade Christmas Card using MME "Merry and Bright" 6x6 Paper Pad!!
This was a card I made for Fia's Anniversary Party Challenge over at Sketches4All.  The challenge was to create a project using the following sketch by Pagemaps:


Since I've been on a roll making sooooo many Christmas cards lately, I decided to just keep it going!!!  I have to admit... This was a tough sketch for a card just because of all the detail... But Lord knows I LOVE to challenge myself and that's exactly what I did!!!
Here's a look:


These are papers from the MME "Merry and Bright" Christmas Paper pad... LOVE IT!!!!
I started with "Kraft-Core" Coordinations cardstock for my base and then began to do a whole lot of fussy cutting!!!!
I fussy cut all the layers using various pattern papers from the paper pad and then inked all the edges for contrast against the background paper.  I then stamped the "woman and the tree" by TPC studios using Blazing Red StazOn ink inside the frame of a pattern paper.  I followed by cutting it out and matting it a few times, inking the edges as I went along!!!  
The "All is Calm" sentiment was also fussy cut from one of the papers and inked, and then added to the front of the card.  I added a bit of sparkling Silver and sparkling Red Christmas twine as well!!!  The bird, "25", and little banner piece were also fussy cut and added, then I finished it with a bit of trim by Recollections.  Hope this inspires you to create something FAB-U-LOUS!!!!

Well gang... Thanks soooo much for stopping in and have a LUCKY day :-)


Sketch N Scrap Card Sketch #15!!!

Hello my fellow crafters and Happy Monday!!!!  I just wanted to stop in and share the latest sketch from Sketch N Scrap!!!

Card Sketch #15 is up and ready to be scrapped!!! Here's a look at the sketch:


And here's a look at my card:


I started by using the "Old World Winter" mat stack by Paperhouse studios.  I knew as soon as I saw the sketch that I wanted to use this vintage paper... It has pages of little "Christmas images" that I cut out to use as my "little squares"!!!!  I matted them with red cardstock from the paper pad, and of course inked the edges of all the papers with "Frayed Burlap" Distress Ink.  I added trim by Recollections down the center of the card, and added a strip of "Mistletoe Paper" atop of it.  I stamped the "Merry & Bright" sentiment by TPC Studios on Kraft paper using "Blazing Red" StazOn ink, fussy cut and matted it,  then used hemp cord to attach it to the front of the card.  I finished by fussy cutting the bells from a separate sheet of paper from the mat stack and adding it atop the sentiment!!!  Another Christmas card down... only 72 more to go!!! Hahahaha!!!! 

Stay tuned for some EXCITING news coming VERY soon!!!!!

Well gang... Thanks soooo much for stopping in and have a LUCKY day :-)


Monday, December 2, 2013

Sketches4All Jingle Bells Blog Hop Begins!!!

Happy Tuesday everyone!!!! Are you ready for another Holiday Hop?!?  This one is brought to you by Sketches4All!!!! 

Welcome to the Sketches4all


So glad you could join us for our blog hop!  You will have nine days to hop around and to complete any and all of the challenges that will be offered by each design team member.  We hope to inspire you this holiday season!  The Hop starts today, December 3rd and ends on December 9th at midnight (PST).  Winners will be announced on December 13th in the Winner's Circle at Sketches4all

There are TONS of prizes to be won!!! One lucky winner will receive the Grand Prize which is this glorious November Kit from Frosted Designs!!! Look at all of the gorgeousness!


There will also be a second place winner of a $20 gift certificate to the Cutting Cafe!


AND...each Design Team member will offer a challenge here at Sketches4all, some with an individual prize!

So how do you participate??

1. Hop around to all of the blog's of the design team members. Follow them and leave a comment. 
(Right away, that will get your name in the hat to win the second place prize!!) 

2. Join the Design Team's Jingle Bells Blog Hop challenges at Sketches4all
These challenges will be posted in the Forum under Special Events. (HERE) 
 (This will get your name thrown in the hat to win the individual prizes.)

3. And... to win the Grand Prize... you will need to complete the hop AND find our mystery sentence!!!

Each Design team member will have a word hidden on their blog. When you collect all eight words you will have found our mystery sentence. After you find it, you will then just personal message it to FIA at Sketches4all. 

That's it! Just complete the blog hop and find the mystery sentence and your name will be in the hat to win that awesome kit from Frosted Designs!!!


Now for a little inspiration and a challenge to give your creative mojo a boost!!!  Since we are in the "month of giving", I decided on a very simple challenge...  All you have to do is create a holiday project that IS NOT a card OR a layout!!!!  This can be a tag, altered pieces, altered picture frames, ATC's, etc... GET CREATIVE!!!!  

I chose to alter a picture frame I've had lying around for quite some time.  I picked it up on clearance at TJ Maxx a while ago for $2.00 because it was a little scuffed up.  No biggie, right?!?  This is how I purchase MOST of my pieces that I alter because I know I'm going to be changing them anyway :-)

Any who... I used the Pink Paislee "Noel" paper pad and some mod-podge to create the outer part of the frame.  
Here's the beautiful paper collection:

And here is my finished frame:


I started by cutting all the outer pieces down to size, then the inner pieces as well.  I inked the edges of everything (as usual!!) then applied it to the frame with mod-podge (matte used here).  For the inside, I cut a piece of paper with these beautiful glittered ornaments all over it to a 4x6 size.  Then I stamped the sentiment by Hero Arts and matted it on a red,white, and green plaid paper which is also the same paper I used for the inside portion of the frame.  
Here's a look at the inner portion:


I tried desperately to get a close-up of the glittered ornaments but they just weren't coming out well as I didn't have much sunlight here in the sunshine state today!!!!  Here's the best shot I could get... You can sort of see the glimmer on them!!!!


You can also see a set of Altered Drawers I created HERE and a Winter Wonderland Christmas Tag HERE!!!  Just to give you some additional inspiration :-)

Now it's your turn to show me what you got!!! Or, what you are giving!!! Hahaha!!! 
All entries must be uploaded to the Sketches4All Gallery and tagged JBHBRANDI to receive credit.  I will choose one randomly drawn winner at the end of the hop to receive a FABULOUS prize pack!!!! Remember, you must become a follower of my blog AND leave a comment letting me know you are hopping along!!!! 

(P.S.... My secret word is "BRING")

Here is the order of the hop so you don't get lost along the way:

Stacy - http://scrapwithstacy.blogspot.com (you are here)


Giorgia - Guest Designer for December - http://joyblonde.blogspot.it/


As you can see there are lots of ways to win on the Jingle Bells Blog Hop!! So come on and join in the FUN!!!

Well gang... Thanks sooo much for stopping in and have a LUCKY day :-)

Sunday, December 1, 2013

Believe In Christmas with DCWV "Christmas Made" paper stack!!!

Happy Sunday my fellow crafters.  I sure hope you have enjoyed the Holiday Hop over at Colorful Creations!!! There were lots of recipes, projects, and inspirational pieces to get you in the holiday spirit!!!

DON'T FORGET: Sketches4All also has their Jingle Bells Blog Hop coming to you on Tuesday!!!! Stay tuned for more details!!!!


Any who... I'm here today to share a few projects I've been working on for a number of different reasons.  It's been non-stop around here lately and now that we're in December, it's only going to get busier!!!!
I am entering ALL OF THESE challenges in the current Friday Challenge over at Frosted Designs!!!! The current challenge gives you the following items for which you must use at least one of them on your project:

Tags
Paper layering
Washi tape
Flags/banners
Patchwork
Circles
Stitching
Stars
Flowers
Buttons 
Arrows

I made sure to include a couple of these items on all of my projects and highlighted them in RED throughout the post to make the items I chose easily visible!!!

"Believe In Christmas" with DCWV "Christmas Made" Holiday Stack
The first project I'd like to share with you is a holiday layout I made using photos from last year's Christmas Holiday.  I recently purchased the "Christmas Made" Holiday Stack by DCWV and have had sooo much fun playing with it :-)
We are currently hosting a DT Sketch Challenge over at Sketches4all using this amazing sketch by Brenda Ragsdale:


And here is my Christmas Layout:


Aren't these paper just AMAZING?!?  I absolutely LOVE them!!!! 

This is also my Inspirational Page for my Creative Monthly Project Challenge over at Colorful Creations!!!

 I began by turning the sketch a quarter turn clockwise and then got to work!!!!
I knew when I saw the sketch that I wanted to create a "paper tear" for the triangular "break" down the center of the page.  So, that's what I did!!!  Then, I just cut out various pattern papers from the stack and layered them on to follow the sketch.  Of course, I inked all the edges of pretty much everything on this page with "Old Paper" Distress Ink.  
I matted the photos on the red peppermint paper, then layered atop a piece of chipboard and pop-dotted it atop of the page.  I cut up a glittered pinecone that I had from last year and used those pieces, along with a little hot glue, to adhere them directly under the chipboard.  
Here's a look:

I finished it with various embellishments (including a rose button by The Girl's Paperie which was coated with Gold Leafing,  a circle "Merry Christmas" Sticker by Paper House Studios which I matted with a kraft scalloped circle die-cut,  a couple of die-cuts and a "Gather Together" tag by K&Company,  Webster's Pages "Christmas at Home" sticker,  Cosmo Cricket "Love You" wood pieces,  raffia ribbon, and other embellies by Recollections.    
 Here are other close-ups:


I truly LOVE how this layout turned out!!! And, I had a lot of fun making it!!!!  


"Sparkling Holiday" Handmade Christmas Card 
Another project I wanted to share is a Holiday Card I made for Rachelle's Anniversary Party challenge over at Sketches4All.  Her challenge is to create a project using mainly red and white, with a splash of green and couple of bells.  Since I've been on a roll making Christmas Cards lately I have soooo much "stuff" out that I knew I could get this done rather quickly.  
Here's a look at my card:


I used papers by Mod Podge and Recollections.  I fussy cut the trees from pattern paper and added them to the bottom.


All the papers were inked using the Festive Berries Distress Ink (which is one my FAVS for this time of year!!!) and then layered on!!!  I used my 2" Circle Punch to cut the star from the paper pad and used pop-dots behind it for dimension.  I stamped the Hero Arts sentiment on Ultra Smooth Premium White cardstock by Spectrum Noir, then cut it out and matted it on red,white, and green plaid paper.  I threaded gold ribbon through it for some "sparkle"!!!!  
I finished the card by adding two K&Company chipboard candy canes which I tied a green bow on and hung the bells from.  
Here's a close-up:


This card was very quick and easy, and it came out pretty cute as well!!! I think I have more than enough cards to mail out to family and friends now... But I'm sure you'll see some more in the upcoming weeks!!!! Hahahaha!!!!


Handmade "Monster High" Birthday Card: "Clawdeen"
Okay.... And the last thing to show you is a birthday card I made for my oldest daughter.  Her actual birthday is tomorrow!!! Although her party isn't until next weekend, we are still going to do a small celebration tomorrow (she has no idea!!!) so I thought I'd make a card that totally rocks!!!!
She is IN LOVE with anything Monster High right now, so the party is a Monster High Themed birthday party.  I made Monster High invites per her request, and used left over papers to make this card!!!! 
Here's a look:

I started by layering on various papers, and matting them all with solid black cardstock.  I used a "circles" embossing folder, "circle" Happy Birthday sentiment,  and a black "belt" with "gold circles" as well.  The girl "Clawdeen" was colored in using various Spectrum Noir Markers and Glitter Gel Pens.  I finished it with matted sentiments and a gold glitter star to go with the "Rock Star" theme!!!!

 This card was also entered into Jessica's Anniversary Party Challenge at Sketches4All where the challenge is to use circles on your project.

Well, gang.... As usual... Thanks soooo much for stopping in and have a LUCKY day :-)