Hello again my crafty friends!!!! I recently held my annual Halloween party for the kiddies this past Saturday and wanted to share some of my "spook-tacular" projects made using my Cricut Expression 2 and various Halloween Cartridges. It's amazing what you make with just a little bit of cardstock and some creativity!!!!
"Handmade 3D Coffin Favor Boxes" cut from the "Happy Hauntings" Cricut Cartridge
First, I wanted to show you a wonderful way to make your favor boxes really creative!!! Using the "Happy Hauntings" Cartridge and some "Black Magic" Coordinations cardstock (Black on one side and colored on the other), I cut out the 3D coffins at 7.5 inches (just big enough to hold all the goodies I wanted to put inside!!). Here's a look:
After assembling them, I cut what was supposed to be the "bottom" layer out of some K&Company Halloween themed cardstock, made it smaller so that it would fit neatly on the top piece of the box, inked the edges with black distress ink, and adhered it to the top of all the pieces. This is what gave them their different designs :-)
The, I just had fun embellishing them all with different embellies and various ribbons!!! Aren't these just adorable?!? Here are some close-ups of them:
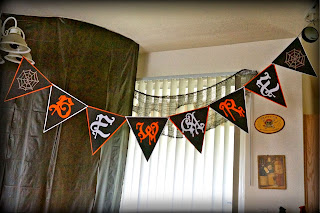
"Beware" Handmade Spooky Halloween Banner made using "Happy Hauntings" Cartridge
I really wanted to make a banner using the "standard" Halloween colors, but wanted something a little different for the font. Luckily, the "Happy Hauntings" cartridge has a "Bloody Font" feature that worked PERFECTLY for this!!! I went with a triangle banner instead of a pennant banner (which is what I almost ALWAYS use!!) because I thought it would look better with the theme! I also embossed the letters using the "polka dots" embossing folder for a little added detail.
Here's the finished banner:
"Creepy Spiders" and "Flying Bats" using Cricut Free Cuts!
Throughout the month of October, Cricut also had several "spooky" themed cartridges as their "free cuts" for a week and boy did I take advantage of it!!! Here are some spiders I cut using the "Spiders" Craft Room Exclusive:
Another "Free Cut" was from the cartridge "A Frightful Affair". From that one, I made the spider webs above and several bats in various sizes and placed them throughout my house. I only adhered the middle of the bats to the wall and pulled the wings outward to make it look like they were "flying"!!! I also tore up a piece of black cardstock until it looked almost circular and made it look like a "hole" in the roof!!! Here's a look:
Using the same bats but in a smaller size, I made a "bat banner" that extended the length of my living room. I used eyelets (should of used brads for more "play" but I will know better next time!!) to connect them all and tied them to the columns in my living area. It was hard to photograph it but you can see a little bit of it here:
And here:
"Wall Size Skeleton" using Cricut Movable Monsters Cartridge
Lastly, I used the "Movable Monsters" Cartridge that I purchased LAST YEAR and NEVER used to make a wall size skeleton!!! I used the "Whitewash" line of Coordinations cardstock for a more "real" look (not soooo bright white!) and cut all pieces at 11.5 inches. Here it is:
Isn't he cute?!? Can a skeleton be cute?!? Hahaha!!!! I used left over black cardstock from the banner I made to fill in his "blank spots"!!! This time, I used brads to attach all the pieces and double sided tape to attach him to the wall :-)
(P.S. Don't forget... There' still time to enter the GIVEAWAY for your chance at some fabulous goodies!!! Click HERE for details!!!)
Well gang.... Thanks soooo much for stopping in to see my "spooky" creations!!!! Have a LUCKY day :-)


Must admit I am jealous. Halloween is my thing-but alas no electronic die cutter. You did an fantastic job turning your home into a Happy Halloweenland!
ReplyDeletefabulous fun projects.. love them all..
ReplyDeleteAwesome projects Brandi....LOVE them all!!
ReplyDeleteAwesome projects Brandi...LOVE them all!!
ReplyDelete